Showing posts with label Appetizers. Show all posts

Sunday, April 28, 2013

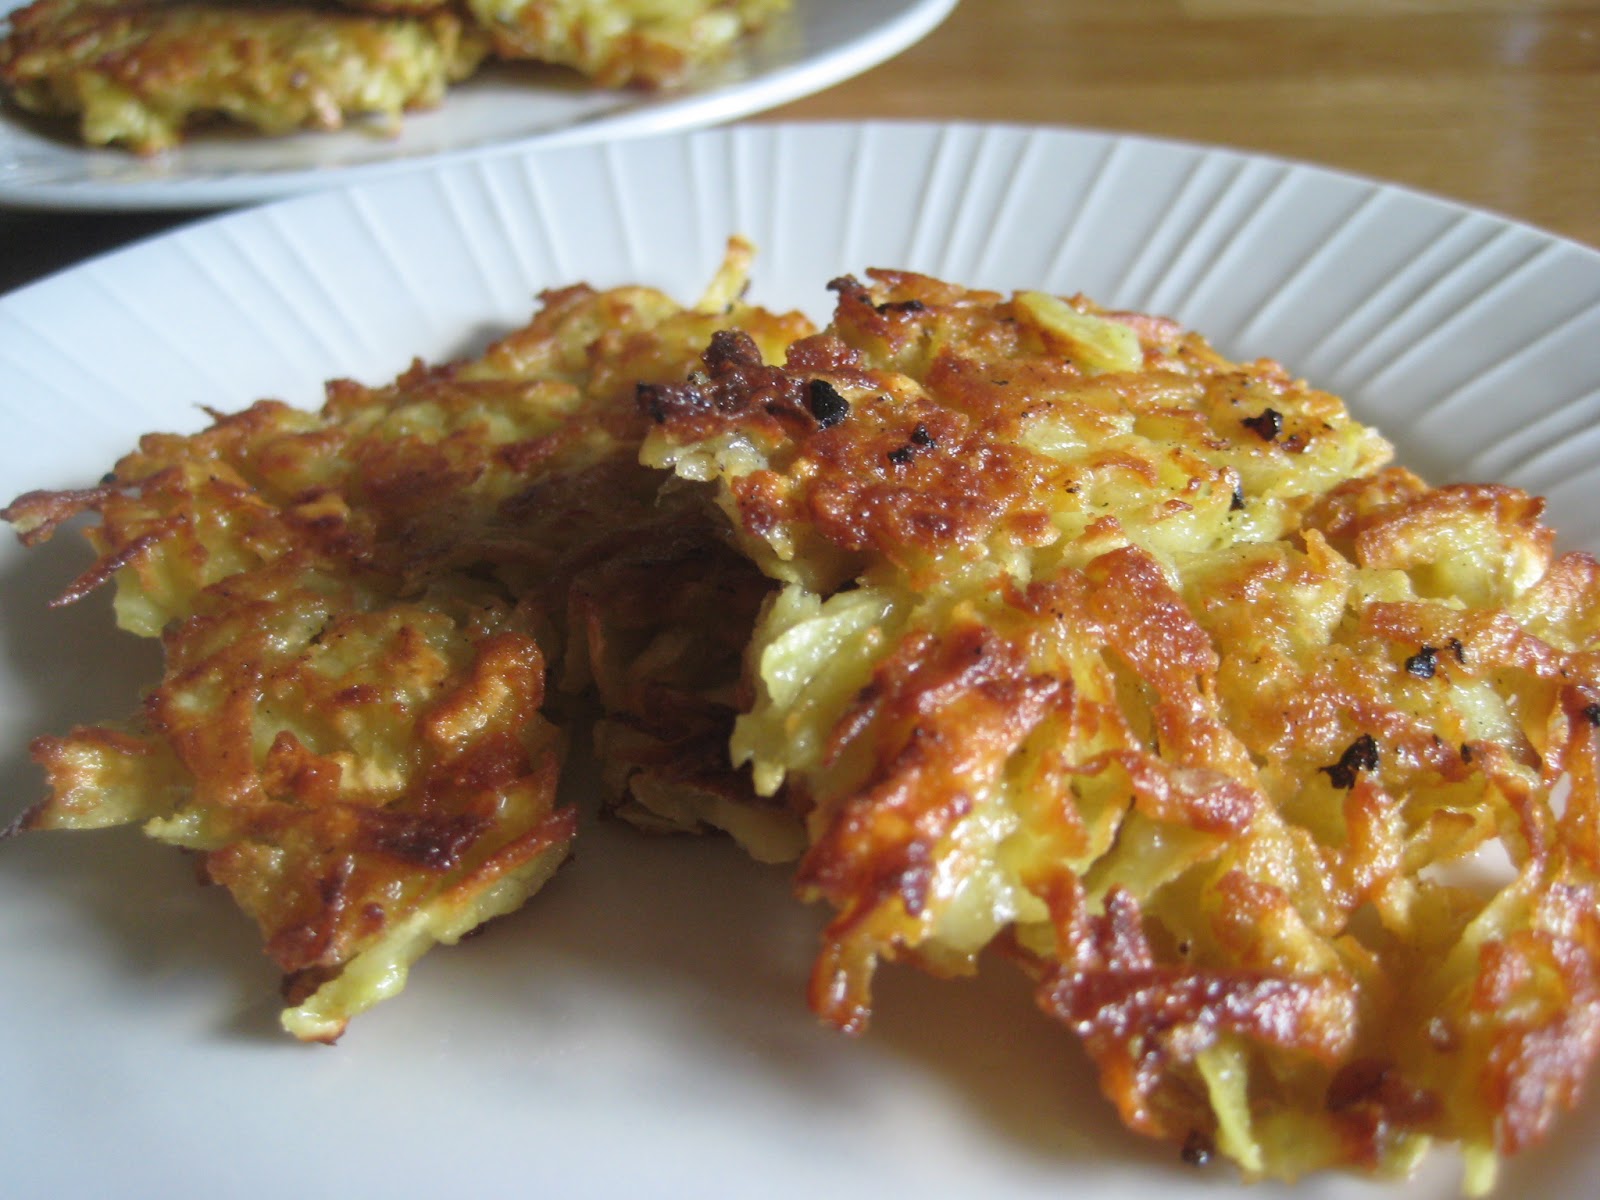
Sweet Potato Latkes


I love latkes. Regular potato latkes. I have also never met a sweet potato we didn’t like. Stay with me, I have a point.

All of a sudden, a craving for crispy potatoes hit. Easily fixed. A quick glance in the pantry confirmed only one small lonesome Yukon Gold potato, BUT…an ample supply of plump sweet potatoes. So...Sweet Potato Latkes here we come!

The following isn’t so much a recipe, as a suggestion of directions. The key is to squeeze all moisture from the grated sweet potatoes, otherwise they will not crisp up and turn golden brown as beautifully as they should. Other ingredients you might include with two grated sweet potatoes: ¼ cup finely chopped onion, scant 1/3 cup all purpose flour, 2 eggs, salt and pepper, and of course some oil and a cast iron skillet for frying.

Peel. Grate. Squeeze. Mix. Fry. Eat.


Sweet Potato Latkes

I like that this dish is not as heavy as sweet potato casserole or as greasy as fries. Rather, they end up some happy place in between. And fairly light if you only eat one or two – which may be challenging given how tasty they are! Plus, they just look special and different. Perhaps fancy enough for an appetizer, or to add a crisp element to a meal if you need that. Enjoy!

Wishing everyone a beautiful Spring.

Tuesday, October 2, 2012

Portobello Mushrooms, Stuffed with Goat Cheese and Kale

Portobello mushrooms. Those things that are as meaty and delicious as steak, without actually being steak. We love Portobello mushrooms but at our place they must be reserved as special treats since they cost a pretty penny. Their size makes them a perfect little appetizer, first course, or light dinner. This method is fancy looking, yet easy to make.


With all that said, these should not be cooked any old way either. They must be fussed over and treated like the kings and queens they are.  (Do not stomp them into a casserole, that’s what plain ole button mushrooms are for!) We like keeping it simple. For dinner last night, we stuffed these beauties with a little goat cheese, chopped up kale (fresh from the garden out back), plenty of freshly cracked black pepper, an assortment of herbs, and one egg to bind it all together.

Portobello Mushrooms, Stuffed with Goat Cheese and Kale

Pile the mixture high into the mushrooms, lay on a foil lined cookie sheet, and bake at 400 F for about 15 minutes, or until the kale starts to crisp up and turn golden-brown. Done. My husband called it “wow”.  (And he never says wow.) Enjoy!

Saturday, March 3, 2012

Avocado Shrimp Salad "Boats"

Isn't it just better when veggies look like so much fun to eat?! Something magical truly happens when you take shrimp and pair it with avocado. Add the salsa ingredients to really kick it up a notch!


Avocado Shrimp Salad "Boats"


Recipe is as simple as can be. Toss together:  cooked shrimp, avocado, cucumber, tomatoes, red onion, jalapenos, cilantro, salt, lime juice. Enjoy! Great with tortilla chips, or, better yet, eat it in lettuce "boats". So fun!

Sunday, February 19, 2012

Kale Chips

My first attempt at homemade Kale Chips. Inspired by my friend Jennifer, at whose home recently I had the most wonderful Kale Chips, I decided to try making these. And...success! Why didn't anyone tell me how easy these are to make at home?? Not to mention, I would venture to guess that munching on homemade oven-baked Kale Chips is any day better for you than munching on fried things.


   Kale Chips


I started with a beautiful bunch of organic Purple Kale. Simply wash, rinse, rip into bite sized pieces, dry (this is where a salad-spinner is a huge help!), then toss with a bit of olive oil, salt and pepper, and bake on a cookie sheet at 350 F for 10-15 minutes. Results: crispy, yummy, wonderful green goodness. Enjoy!


Tuesday, December 27, 2011

Ham and Swiss Mini Pizzas

Our apartment has an over-sensitive smoke alarm that goes crazy and starts yelling "fire" every single time we use the oven at 400 F or higher. Without fail. It's possessed or something. While we appreciate the safety feature and feel very protected with it around, it is very annoying to feel your blood pressure jump up at the sudden alarm, especially when handling very hot food. Anyway, as much as I despise the stupid smoke alarm, these mini pizzas were so worth it! Two of these are filling enough for a meal, but these would be great as appetizers too. They couldn't be easier to make. Plus, it's a great way to use up some of your leftover Christmas ham  :)


Ham and Swiss Mini Pizzas


Serves two.

You will need:
2 english muffins
2 tablespoons dijon mustard
1/2 cup shredded cooked ham
Optional - leftover roasted veggies such as leeks, onions, mushrooms, or any other veggie, thinly sliced
4 oz thinly sliced swiss cheese (or any cheese really!)

Position an oven rack in the top third of your oven. Preheat oven to 400 F. Split each english muffin and spread with mustard, lay these open faced on a baking sheet.  Layer ham, veggies and cheese on top of each english muffin. Broil or bake these two to three inches from heat for eight or nine minutes, just until cheese has melted and muffin is toasty. Enjoy!

Note: these would be a snap to make in a toaster oven too, if you have one!

Monday, December 5, 2011

Easy Barbecue Turkey Buns

As I mentioned in my previous post, we are STILL enjoying our leftover Thanksgiving Turkey now, a couple of weeks after the day. I've tried two new experiments this year with the leftovers...this recipe is much easier than the first but both are totally delicious! Seriously, this one is easy easy easy. For Chinese food or dim sum fans, this is a very close cousin of those delightful Chinese Barbecue Pork Buns. This one uses store-bought refrigerated biscuit dough, and takes less than five minutes of prep time, and only twelve minutes cook time. Hope you try it!

Easy Barbecue Turkey Buns


 You will need:

1 tube refrigerated biscuit dough (8 biscuits)
1 1/2 cups leftover cooked shredded turkey
1/2 cup barbecue sauce

Mix turkey and barbecue sauce until well combined and set aside. Separate the biscuits. Cut a small hole in the side of each biscuit, and fill with a heaped tablespoon of the turkey mixture. Pinch the hole shut. Once all are filled, steam these for about 11 or 12 minutes in a cooking-spray coated foil-lined bamboo steamer or whatever you normally steam veggies in. The buns will puff up to around two and a half times their size and firm but springy to the touch when done. Enjoy!

Note: regular biscuits (non-flaky layers) work best for this recipe.

Wednesday, September 14, 2011

Samosas

Samosas are probably the most delicious Indian snack, ever. At least, according to a lot of people I know. And samosas are the most requested Indian dish in my circle of friends. Seriously, even people who don't like Indian food will eat these delicious little deep fried savory treats.

There are literally hundreds of different ways to make the samosa filling, depending on where you grew up or who you ask, but here's a simple recipe that I have been making for years and has become very popular with friends. This filling is an all veggie option, and is really tasty with just the right amount of spice and tangyness. The pastry is just about perfect too. (If you don't want to go to the trouble of making the pastry at home, a couple of shortcuts are wonton skins or frozen puff pastry. Both are easy substitutes and cut your prep/cooking time significantly.) Whether you choose the shortcut methods or the original, prep is still labor intensive so make sure you have plenty of time before getting started. Hope you enjoy this recipe!

Samosas


For the samosa filling, you will need:

2 Tablespoons vegetable oil
1/2 teaspoon cumin seeds
1/2 teaspoon mustard seeds
2/3 cup finely chopped onion
2 Tablespoon chopped fresh cilantro
1 Tablespoon dried mango powder, or 2 Tablespoons lemon juice
1 teaspoon cumin powder
1 teaspoon coriander powder
1 teaspoon salt
1 teaspoon red chilli powder
5 medium potatoes, peeled, cut into 1/2" pieces and boiled for 15 minutes
1/4 cup peas (optional)

Heat the oil in a large skillet on medium heat. When oil is hot, add the cumin seeds and mustard seeds. When the seeds pop, add onion, and cilantro. Sauté until the onion becomes translucent, about 3-4 minutes, then add dried mango powder or lemon juice, cumin and coriander powder, salt, and red chilli powder. Sauté a few minutes just until the spices have cooked a bit, then add the cooked and drained potatoes, and the optional peas. Mix well and sauté just until heated through, them remove from heat and set aside.

To make the samosa pastry, you will need:

2 cups plus 2 tablespoons all purpose flour
2 1/2 Tablespoons vegetable oil
1/2 teaspoon salt
Water

Mix the flour, oil and salt in a mixing bowl, then add water gradually (about 1/4 cup at a time) until the dough holds together, and knead well. Roll into a ball and cover with a damp paper towel. Let this dough rest for about 20 minutes. Then, break off walnut sized balls of the dough, and roll out into 5-6" circles. Cut each circle in half. Fold each half-circle to form a cone. Fill the cone with about a spoonful of the potato mixture. Press the samosa between your palms to remove air pockets. Moisten the edges with some water, and seal.

Deep fry the samosas in a lot of oil (at least 2" deep) until golden brown, turning twice; drain. Serve hot plain or with your choice of chutney (sour chutneys are best), or preferred dipping sauce. Enjoy!

Wednesday, June 22, 2011

Dreaming of Italy: Prosciutto e Melone (Prosciutto and Melon)

I want to go to Italy. I want to drink Italian wine. I want to eat fresh spaghetti with tomato and basil. I want to sit at a road side café and sip espresso that's as thick as melted chocolate. I want to visit Firenze and stand in awe of the art and architecture of the Renaissance. I want to go to Napoli, and eat authentic Napolitano pizza. I want to stand on a terrace and look out over Rome in all its past and present glory. In short, I want to be Elizabeth Gilbert in Eat Pray Love and do nothing but eat great food and experience "the sweetness of doing nothing”.

So, until this trip to Italy happens, for now, this will do. My homemade version of a classic Italian savory treat, Prosciutto e Melone. Cantaloupe wrapped in Prosciutto. I added just a touch of basil and balsamic vinegar. We enjoyed this treat tonight, and it was so filling, it was basically dinner!

I can practically hear the sounds of the street by the café. After all, in my head I’m in Italy anyway.

Prosciutto e Melone (Prosciutto and Melon)


Really simple to put together, and this can be made ahead of time. All you need is some Cantaloupe, sliced or balled, thinly sliced Prosciutto, a bit of balsamic vinegar, and some basil (optional). Assemble Prosciutto and Melon as shown, drizzle on some balsamic vinegar, and serve. Enjoy!

Wednesday, June 15, 2011

Prosciutto, Fig, and Goat Cheese Pizza

You might already know this, but, according to research, human beings mostly crave three tastes:  salt, sweet, and fat.  Ergo, this Prosciutto, Fig, and Goat Cheese Pizza satisfies the most serious of food cravings.  I triple-dog dare you to try it!

Actually, there is nothing new or revolutionary about this combination of ingredients. However, the saltiness of the prosciutto, the sweetness of figs, and the creamy goat cheese, are simply elevated to new planes of edible joy by putting it all together on a pizza crust, and baking it to toasty, salty, sweet, creamy perfection.
So simple to put together, a three-year old could help make this (maybe not with the oven part of it!)
Do try it.

Prosciutto, Fig, and Goat Cheese Pizza


Serves 2

You will need:
2 10" flatbread or pre-baked pizza crusts
2 very thin strips of prosciutto (substitute with ham if you must), torn into smaller pieces
8 to 10 dried figs, halved
2 heaped tablespoons goat cheese
fresh cracked black pepper

Preheat oven to 400 F. Place flatbread or pizza crusts on a cookie sheet, sprinkle the prosciutto and figs on top, then crumble goat cheese over that. Add enough fresh cracked black pepper to suit your taste, then bake at 400 F for 12-13 minutes, or until edges of flatbread/crust turn golden brown. Enjoy!

Note: Fresh figs won't be in season for another month in Washington, so I used dried figs which tasted just as good. Either way, get some figs on it!

Saturday, April 30, 2011

Avocado-Smoked Salmon Crostini

This is an easy brunch recipe, and a favorite with us. Who doesn't love smoked salmon on toasted bread or a bagel? Ah, but, this one comes without the heaviness of the conventional cream cheese combination, and, instead has the heart-healthy delights of avocado and olive oil. Do try it!

Avocado-Smoked Salmon Crostini


Serves 2

1 avocado, diced
4 oz. smoked salmon, cut into 1" or 2" strips
2 teaspoons olive oil
a pinch of kosher salt
2 tablespoons chopped red onions
1 tablespoon chopped fresh parsley
4 slices of any bread, crisply toasted
lemon wedge - optional

Mix the smoked salmon, oil, salt, onions, parsley and set aside. Divide the diced avocado and lay some on top of each of the four slices of toast. Spoon the smoked salmon mixture evenly on top of toasts. If desired, squirt fresh lemon juice over this. Enjoy!

Thursday, March 3, 2011

Vietnamese Rice Paper Rolls (Summer Rolls)

What can I say? I guess I've been on an Asian food kick this week...enjoy!

Spring can't come fast enough and we are all craving fresh foods. This is a deliciously fresh-tasting bundle of veggies wrapped in rice paper skins. Have you ever used rice paper skins? They are very brittle to the touch, and need to be handled carefully. Soaking it in water for a few seconds softens it, and makes it easy to work with. They can be eaten raw like this once softened. Here is the recipe:

 Vietnamese Rice Paper Rolls (Summer Rolls)


You will need:
2 cups shrimp, peeled, thoroughly cleaned and cooked (click here if you're wondering how to clean)
1 cup peeled and thinly sliced cucumber
1/2 cup matchstick carrots
1/2 cup thinly sliced green onions
2 tablespoons fish sauce
2 tablespoons chopped fresh cilantro
splash of lime juice
1/2 teaspoon black pepper
12 rice paper skins (available at any asian grocery)

Combine all ingredients from shrimp through black pepper together in a bowl. Put some water in a shallow dish, or dinner plate, and soak a rice paper skin in this for about 15 seconds, then turn over and soak again - this softens it. After soaking, remove to a clean work surface and pile one heaped tablespoon of the shrimp mixture on top of the skin. Fold sides in, and roll up, laying seam side down when finished. Repeat for remaining skins, or until you've run out of the filling! Serve immediately, or refrigerate until needed. These can be made up to one day in advance, or make terrific cold lunches the next day. Enjoy!

Saturday, February 12, 2011

Chicken 65

A true favorite from South Indian cuisine. This immensely popular dish is probably the most ordered appetizer at non-vegetarian restaurants in Chennai (and elsewhere in South India).

You might be wondering - what the heck does Chicken 65 mean anyway? There are so explanations for this name, depending on who you ask. Some say it was named for the year (1965) in which it was invented, some say it was the cook's/inventor's street address.
While the name debate continues...I am enjoying my Chicken 65 for dinner tonight. Here is the recipe:

Chicken 65


You will need:
1 lb boneless chicken, cut into small pieces
4 teaspoons red chilli powder
2 teaspoons coriander powder
1/4 teaspoon turmeric
1/4 teaspoon garam masala (available at any indian/asian store - or substitute with equal parts ground cinnamon and ground clove)
5 teaspoons lemon juice
2 teaspoons plain yogurt
1/2 teaspoon minced garlic
1/2 teaspoon grated fresh ginger
1 teaspoon salt
6 drops red food coloring
2 cups vegetable or canola oil to deep fry
optional - fresh cilantro leaves for garnish

In a bowl mix red chilli powder, coriander powder, turmeric powder, garam masala, lemon juice, yogurt, garlic, ginger, food coloring, and salt until it forms a thick paste. Add chicken to this and coat well. Let marinate in the refrigerator for at least an hour.
Heat oil in a wok, or deep frying pan, and deep fry the marinated chicken on medium high for about six minutes on each side. (Cooking time may vary according to the size of the chicken pieces, my chicken pieces usually no more than a half-inch thick, so takes about 6 minutes frying time on each side to cook through.)
Drain on paper towels, garnish with cilantro and lemon wedges and serve immediately. Enjoy!

Wednesday, February 2, 2011

Chilli Fried Fish

Fish cooked to crispy perfection on a bed of caramelized onions. I can guarantee that unless you've been to restaurants or someone's house in Southern India, you have never had fish that is anything like this. You must try this.

This fried fish reminds me of home like nothing else does, and brings food memories flooding back that are among my fondest. My mother would tell you that I have been eating this kind of fried fish ever since I was in diapers.

My recipe below is only a humble approximation of the fried fish (meen varuthathu, especially karimeen varuthathu) that is so popular from Kerala cuisine. The big problem...is the type of fish that is available here. My mother made this with Salmon while she was visiting me last year, and it was really good. I have since made it again and again with various other fish, and have grown accustomed to using tilapia due to it's abundance at my local grocery stores. It stands up to the high heat decently, absorbs the spices well, turns crispy, and is entirely delicious.
 
Chilli Fried Fish


You will need:
1 lb tilapia filets cut into 3" chunks
2 heaped teaspoons red chilli powder
1 heaped teaspoon ground black pepper
3/4 teaspoon salt
1 medium red onion, sliced
3 tablespoons veg oil

Mix red chilli powder, pepper and salt together and rub it all over the fish, both sides. Let marinate at room temperature for about 20 minutes. Heat the oil in a large skillet on medium heat, then lay a single layer of sliced onions in the pan to make a "bed". Lay the fish on top of the bed of onions, then cover the skillet and cook on medium heat for about 4 minutes. Do not stir. Turn the fish over, and cook covered for another 4 minutes. Do not stir. Then, remove the lid and crank the heat up to high, and cook an additional 3 minutes on each side, until fish is nicely browned. Serve hot, with some of the browned onions from the pan. Enjoy!

Friday, November 26, 2010

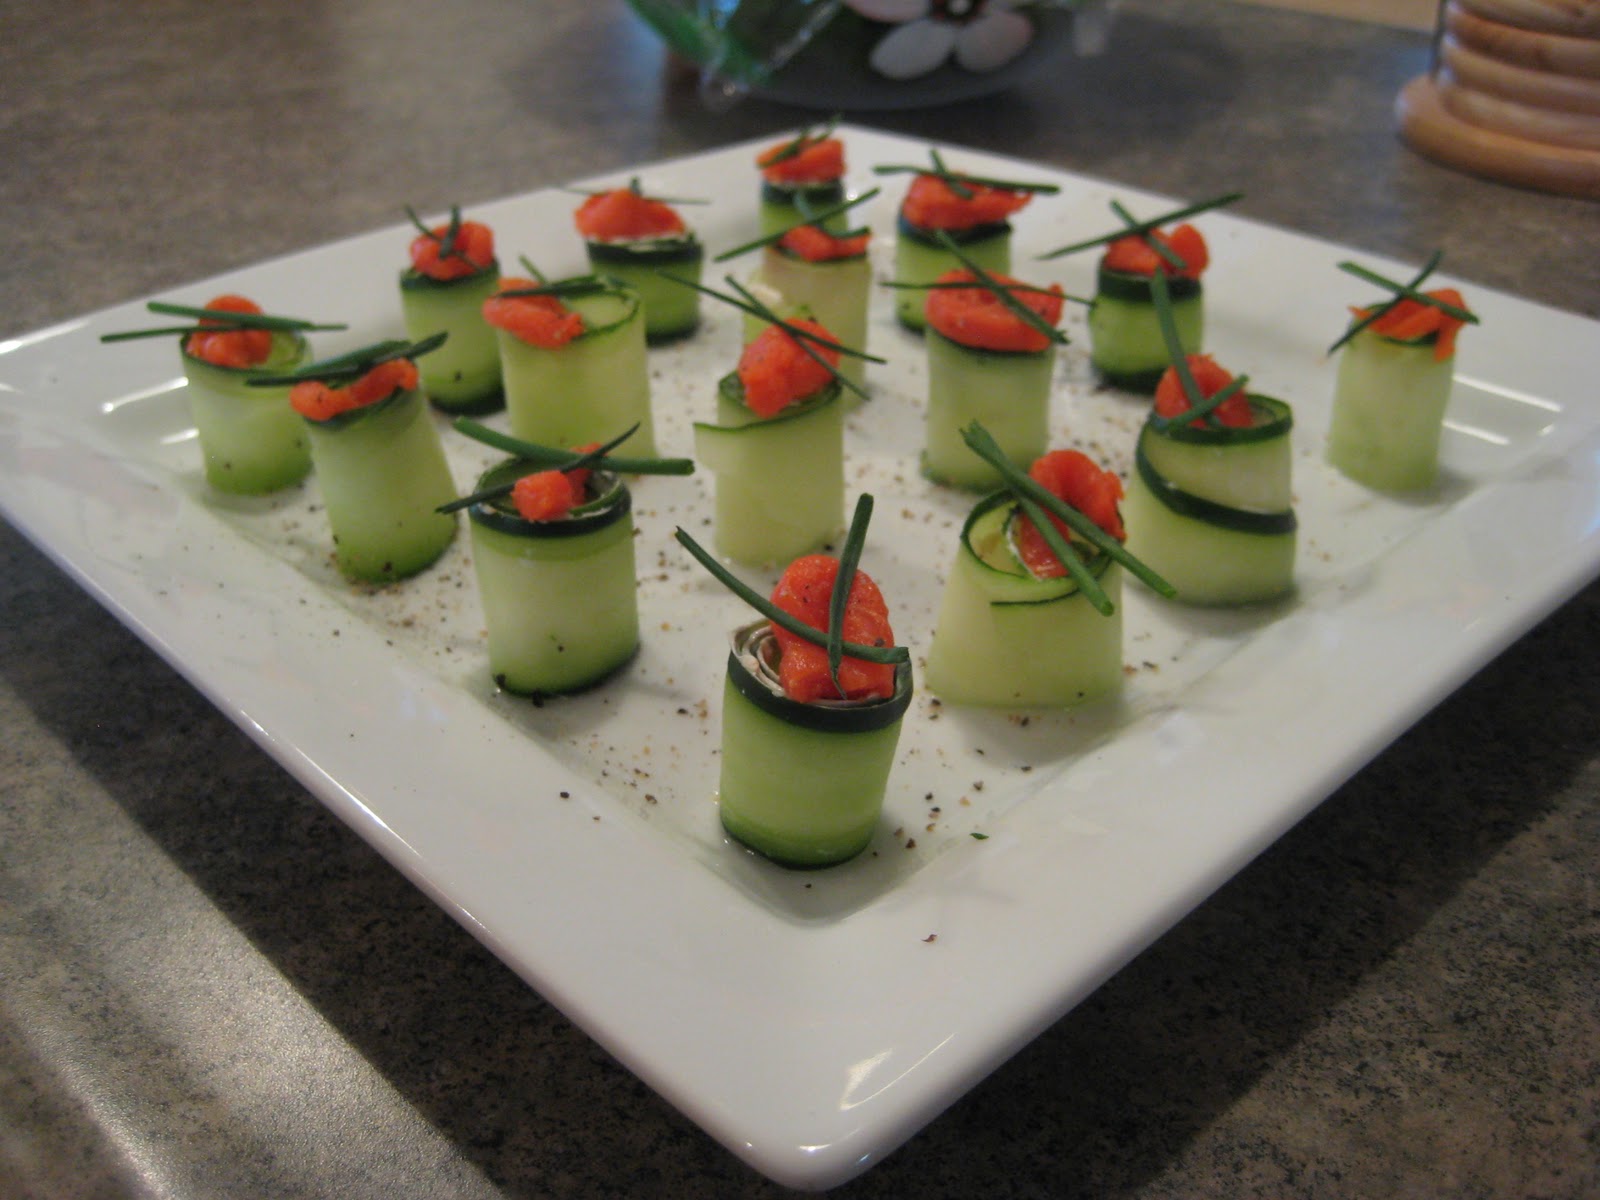
Smoked Salmon Cucumber Rolls

I ushered in my Thanksgiving dinner yesterday with this refreshingly light appetizer. I figured, we could all use a palate cleanser before the onset of all the rich Thanksgiving food! Those who like smoked salmon or lox with cream cheese and bagels will love these Smoked Salmon Cucumber Rolls. I saw it in a magazine once, but modified it a bit to make it my own:


Here is the recipe:

You will need -
1 medium sized cucumber
2 oz. smoked salmon, cut into thin strips
4 oz reduced fat cream cheese, softened
1 1/2 tsp prepared horseradish
1/4 tsp coriander powder (trust me)
pinch red chilli powder (again, trust me)
pinch turmeric (I heard that!)
5-6 uncut fresh chives
black pepper
salt
a vegetable peeler

Mix softened cream cheese with horseradish, coriander powder, chilli powder, and turmeric.
Make long strips of cucumber using your vegetable peeler. I like leaving just a little bit of skin on the edges, I think it looks prettier that way.
Wipe cucumber strips dry with a clean kitchen towel or paper towel.
Spread cream cheese mixture into cucumber strips and roll them up, and stand them up straight.
Arrange smoked salmon, and cut up chives on top. Sprinkle with salt and pepper.
(You can make this entire thing a day ahead of time and refrigerate until serving time, but if you do this put a paper towel on the plate before setting the rolls on top because the cucumber and cream cheese will release a bit of water when they sit like that and you don't want to serve them swimming on a plate!) Enjoy!

Saturday, November 6, 2010

Game Night

Ryan and I love board games, and getting together with others to share this love :) So that is exactly what we did last night. We had some fellow "under 30ish" friends over for games, talk, food and drink, and laughs. And we had several laughs, indeed!

In an effort to maximize time with my guests, keep the food and drinks coming, and make clean up a snap, these are a few simple rules I follow:

1) Drippy food = bad. Try to avoid anything too saucy or soupy, it WILL spill.

2) Food on sticks = good! Make oily foods as "touch-free" as possible. Put as many foods as you can on skewers/toothpicks. (Chips may be the exception.) The last thing you want is an undesirable sheen on your game pieces or dice.

3) Keep the path around drinks and food cleared of chairs, stools, or other obstacles to avoid traffic jams.

4) Put extra coasters out on end tables and other surfaces...people will like that they are easy to find.

5) Show guests where recyclables (glass bottles and such) go, and where the garbage is so paper plates and napkins can go directly there! All of my guests cleaned up after themselves, which was a nice surprise for me later!

6) This one is my favorite - if you have dogs, let them loose after the party. They will save you the effort of cleaning crumbs and food off the floors :)

Now for the food. Here are some fun foods that we served last night. These are super easy to make and can be prepped days ahead of time.

Cheese and Spinach Tortellini


Dress up store-bought pasta (like boil-and-serve tortellini!) by serving them on skewers and putting them on a nice plate. You can do all this ahead of time and just heat up the plate before your guests arrive. Drizzle with just a touch of olive oil and fresh cracked black pepper just before serving. Leave the pesto on the side for those who don't care for the green stuff! Or, better yet, serve marinara sauce on the side...now if only I had thought of that last night! I guess hindsight really is 20-20.

Buffalo Chicken Dip

This zingy dip is extremely popular around these parts, particularly in our circle of friends. Another dish that can be assembled ahead of time and just heated up in the oven before guests arrive. Here is my version:
You'll need:
1 pkg cream cheese, softened
2 cups cooked, shredded chicken breast
1/2 bottle Frank's buffalo wing sauce
1/2 cup ranch dressing
2 cups shredded monterrey jack cheese
Spread softened cream cheese in the bottom of a 9x13 pan. Mix chicken breast meat with buffalo wing sauce, and spread this over the cream cheese. Drizzle the ranch dressing over this. Top with shredded cheese, and bake at 350 degrees F until cheese has melted and is bubbly.  Serve warm. Really good with tortilla chips.

Cocktail Bites


Who doesn't like cheese, olives, and meat at a party? Throw them all on toothpicks in varying combinations and you're done. They sell mini pepperoni slices (not quite as wide as a penny!) in stores now, those are just perfect for these. Pair with cut up cheese cubes and manzanilla olives and you're all set. Enjoy!
Monday, October 4, 2010

To the Far East and back in my kitchen

The pork shoulder I mentioned last week has been completely used up. I’m very happy to say, after having fed three people four meals each with two and a half pounds of pork, I can cook economically and the food can be interesting! Our journey to the Far East and back since last week:

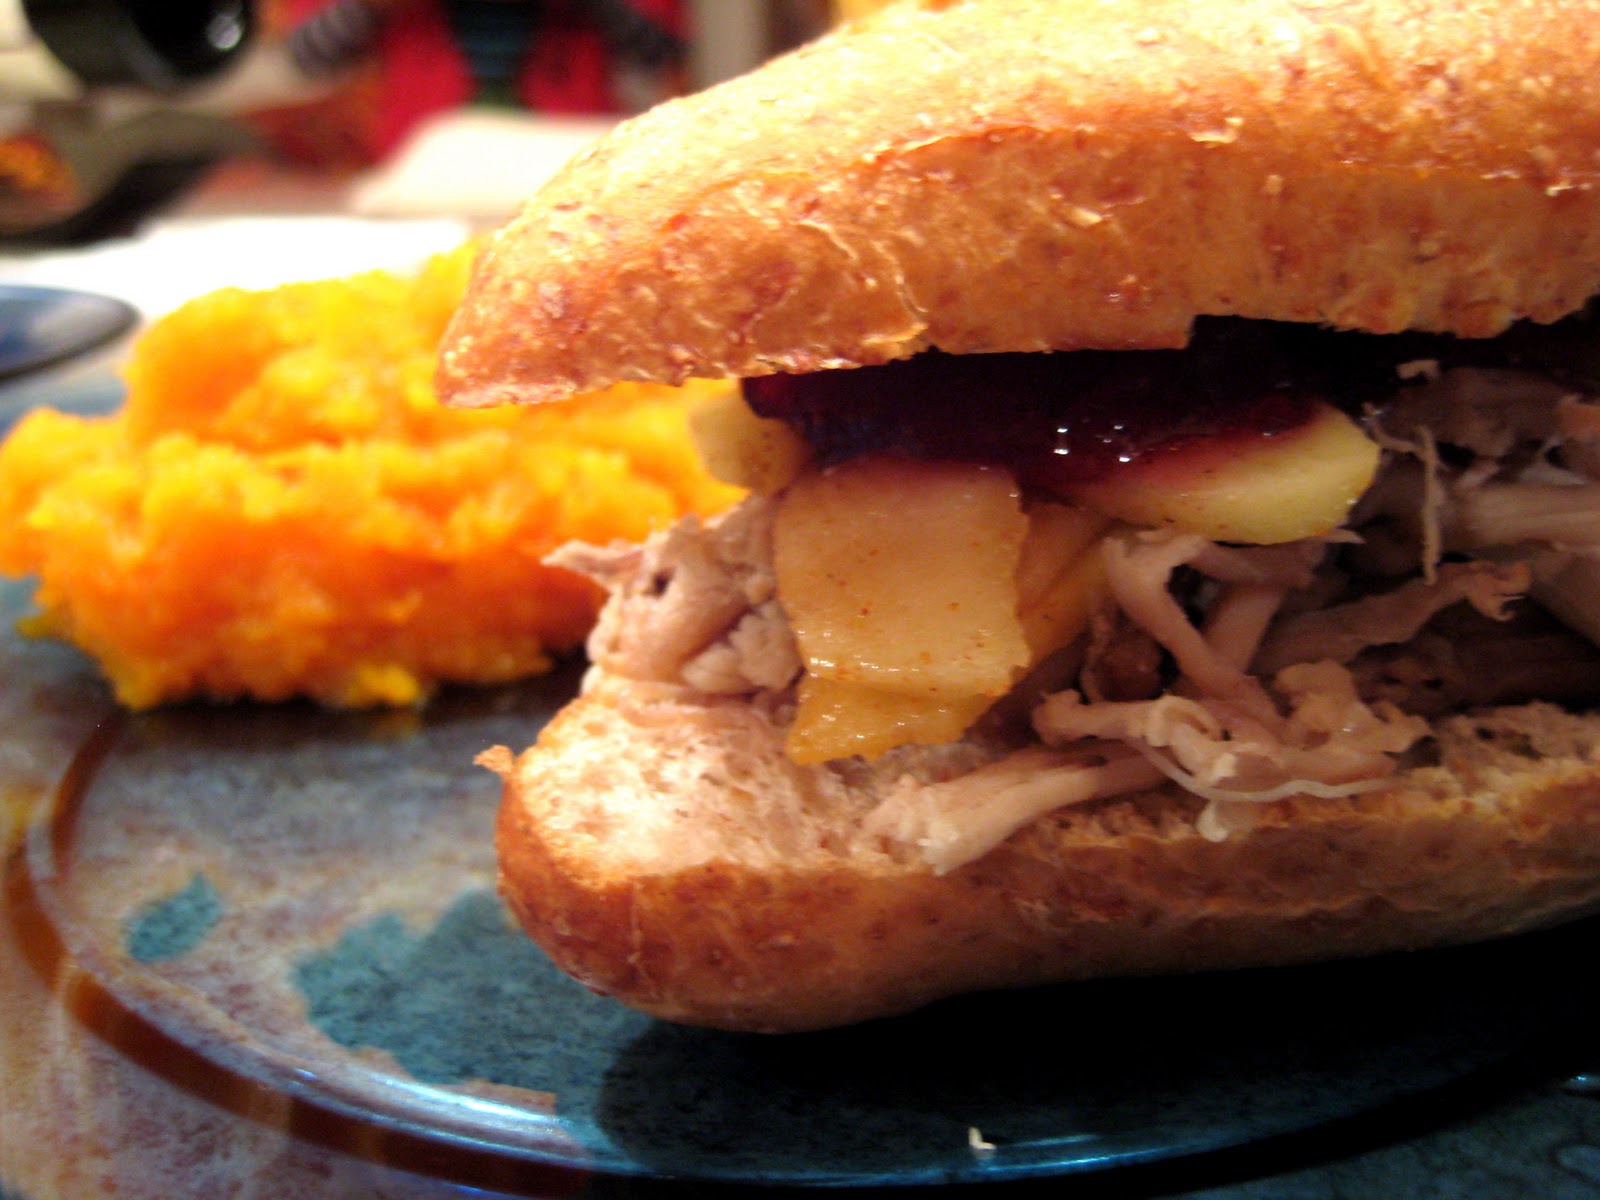
Pork sandwiches w/ apple-cranberry chutney (Good ole’ fashioned American)


Layer on top of a burger bun, or other sandwich rolls: shredded pork, whole-berry cranberry sauce (from a can), and sliced apples sauteed for just a couple minutes with a bit of butter, pinch of cinnamon, and a little chilli powder, salt, and pepper (trust me, it’s very good). It was surprisingly good. Well, you’ve got pork, apples, and cranberries…how can you go wrong?

Bak-ku-teh (Vietnam)
My mother traveled to Vietnam earlier this year and brought me back some very interesting spice mixes, along with the cute little bowl and chopsticks that you see in this picture. I added the bak-ku-teh mix to some boiling water, and then threw in shredded pork, cremini mushrooms, and shredded napa cabbage.


Note 1: The grave mistake I made was throwing all the ingredients into the boiling water all at once. Next time, I would have blanched the cabbage first.
Note 2: I was not entirely happy with the flavor of the spice mix itself. I added soy sauce, fish sauce, and some vinegar to “fix” it. That seemed to work!


Spring rolls (er…generic Asian?)
A classic, family favorite! No picture because we ate them all before anyone thought to capture it. But, I must say, this is one of those extremely versatile dishes. Did you know that you can fill a spring roll wrapper with just about anything, deep fry it, and it will always turn out completely delicious? I have been making these for years, but always only for get-togethers or to take somewhere with us. I have never before made them just to eat at home, but then I asked myself “why the heck not?” so there you have it. I first learned to make spring rolls from one of my best friends, Gina, whose mother is a whiz in the kitchen (particularly in Asian foods since she is Thai). So these were made with the pork, and shredded napa cabbage. That’s all! Delicious.

Roasted Butternut Squash
Butternut Squash is clearly not pork, but I just have to talk about it since this is Fall. I mean, come on, when else can you put a pile of orange goo on a plate and call it yum?


We had some with our pork sandwiches last night, roasted with just a little bit of butter and brown sugar. So yum!

Friday, September 17, 2010

Sushi - The Ultimate "Play" Food

Play with your food much? Then Sushi is the perfect food for you. We made these for dinner tonight. Just a couple of easy rolls with our favorite ingredients, that are available outside of a Japanese restaurant. So who cares if the wasabi comes out of a tube? :) We also had this yummy new ginger sauce, that I picked up while at the Asian store this morning...delicious.


Ryan and I first learned how to make our own maki (sushi rolls) from a friend about two years ago. It is so easy! Since then, we have saved ourselves quite a bit of money making our own home-made versions, and, we have definitely eaten sushi more often. And...back to the "play" thing. Making sushi really does feel like play. And with colorful food, like sushi can be, it's even better :) So do try this at home.

Saturday, August 28, 2010

Pork and Vegetable Shumai

After three days of Kulfi vegetables are not only desired, but necessary! So I will be writing about, and eating vegetables quite a bit over the coming days. Hold me accountable, people!

I was at the Asian store yesterday (the bulk shopping day!) and stocked up on spring roll skins. I love these because they are incredibly versatile as far as Asian food goes (I will be making Summer Rolls later this weekend, which are basically Spring rolls that are not fried!). I made Pork and Vegetable Shumai last night, the ultimate in Dim Sum fare, and it was delicious.

How yummy does this look?


Five or six of these dumplings are enough to fill you as a meal does. And, they are so easy to put together. You can use pretty much anything for the filling! It really is all about whatever vegetables you have leftover in the fridge, balanced with the right Asian ingredients. I used shredded carrots, lettuce, green onions, ground pork, green chillies, a bit of garlic and ginger, some cilantro, lime juice and a dash of soy sauce (for salt and flavor!). Just mix it all together in the food processor (yes, it is that easy), and add two egg-whites to bind it together. Shumai filling ready! Pretty healthy too with all those veggies, right? Oh, and you can make this filling a day ahead of time! Just store it in the refrigerator covered tightly. Then, all you do is fill the skins with about a spoonful of filling each, steam the Shumai for about 12 minutes, and serve. Pair it with any Asian dipping sauce. Enjoy!