Saturday, December 31, 2011

Candy Cane Mocha!

Start the New Year off right by keeping five bucks in your pocket and make this at home! It is warm, richly comforting, and so delicious. Just as good as the Starbucks Peppermint Mocha, if you as us :) And you've got even more of a reason to make this if you got stuck with a bunch of candy canes over Christmas and you have no idea what to do with them!

Candy Cane Mocha


Serves 1

You will need:

1 cup prepared coffee with milk or cream or however you would normally make it
2 tablespoons finely chopped milk chocolate, or semi-sweet choc chips
1 teaspoon candy cane bits
Optional - 1 1/2 teaspoons white sugar
Optional 1 tablespoon whipped cream
Optional - cinnamon for sprinkling

Heat coffee, chocolate, candy cane bits, and sugar in a saucepan over medium heat, stirring to ensure chocolate melts evenly and doesn't stick to the bottom. When warmed through, pour into a mug, top with whipped cream and cinnamon. Enjoy!

Tuesday, December 27, 2011

Ham and Swiss Mini Pizzas

Our apartment has an over-sensitive smoke alarm that goes crazy and starts yelling "fire" every single time we use the oven at 400 F or higher. Without fail. It's possessed or something. While we appreciate the safety feature and feel very protected with it around, it is very annoying to feel your blood pressure jump up at the sudden alarm, especially when handling very hot food. Anyway, as much as I despise the stupid smoke alarm, these mini pizzas were so worth it! Two of these are filling enough for a meal, but these would be great as appetizers too. They couldn't be easier to make. Plus, it's a great way to use up some of your leftover Christmas ham  :)


Ham and Swiss Mini Pizzas


Serves two.

You will need:
2 english muffins
2 tablespoons dijon mustard
1/2 cup shredded cooked ham
Optional - leftover roasted veggies such as leeks, onions, mushrooms, or any other veggie, thinly sliced
4 oz thinly sliced swiss cheese (or any cheese really!)

Position an oven rack in the top third of your oven. Preheat oven to 400 F. Split each english muffin and spread with mustard, lay these open faced on a baking sheet.  Layer ham, veggies and cheese on top of each english muffin. Broil or bake these two to three inches from heat for eight or nine minutes, just until cheese has melted and muffin is toasty. Enjoy!

Note: these would be a snap to make in a toaster oven too, if you have one!

Monday, December 5, 2011

Easy Barbecue Turkey Buns

As I mentioned in my previous post, we are STILL enjoying our leftover Thanksgiving Turkey now, a couple of weeks after the day. I've tried two new experiments this year with the leftovers...this recipe is much easier than the first but both are totally delicious! Seriously, this one is easy easy easy. For Chinese food or dim sum fans, this is a very close cousin of those delightful Chinese Barbecue Pork Buns. This one uses store-bought refrigerated biscuit dough, and takes less than five minutes of prep time, and only twelve minutes cook time. Hope you try it!

Easy Barbecue Turkey Buns


 You will need:

1 tube refrigerated biscuit dough (8 biscuits)
1 1/2 cups leftover cooked shredded turkey
1/2 cup barbecue sauce

Mix turkey and barbecue sauce until well combined and set aside. Separate the biscuits. Cut a small hole in the side of each biscuit, and fill with a heaped tablespoon of the turkey mixture. Pinch the hole shut. Once all are filled, steam these for about 11 or 12 minutes in a cooking-spray coated foil-lined bamboo steamer or whatever you normally steam veggies in. The buns will puff up to around two and a half times their size and firm but springy to the touch when done. Enjoy!

Note: regular biscuits (non-flaky layers) work best for this recipe.

Thursday, December 1, 2011

Rustic Turkey Soup with "Stuffing Dumplings"

Who doesn't enjoy leftover Turkey for days after Thanksgiving? There is sheer genius in cooking a large bird just so you can enjoy the leftovers afterwards. Turkey soup, Turkey chili, Turkey pot pie, Turkey quesadillas. You name it...we've all had it.

I tried two new experiments this year, and these have to be my favorite leftover turkey recipes so far! Turkey Soup with "Stuffing Dumplings", balances delicate herbs with rich roast turkey (it's even better with homemade turkey stock!) with the added surprise of "stuffing dumplings"! Who knew that leftover stuffing could make wonderful dumplings in soup. And Barbeque Turkey Buns are super fast to make, moist and delicious. If you're looking for ideas, I hope you enjoy these recipes...here is the first in a series of two posts. This soup has all the comfort of its chicken noodle cousin, and is a wonderful way to use up some of those leftovers in a fun new way!


Turkey Soup with "Stuffing Dumplings"


Serves 5 - 6

You will need:

1 large carrot roughly chopped
2 stalks celery roughly chopped
1/2 cup finely chopped white onion
3 cloves garlic, crushed
2 cups cooked leftover shredded turkey meat
1/2 teaspoon fresh rosemary
1/2 teaspoon black pepper
salt to taste
3 tablespoons flour, divided
2 cups leftover stuffing
juice of 1 lemon
2 tablespoons olive oil
5 cups broth or stock of any kind

Heat olive oil in a soup pot on medium heat.  Saute onions and garlic for two or three minutes, just until onions are translucent. Add carrots, celery, rosemary, salt and pepper, and saute for another four or five minutes, stirring occasionally, just until vegetables start to soften. Sprinkle 1 tablespoon of flour into the vegetable mixture. Then add broth or stock and bring to a boil. 
Mix 2 tablespoon flour into the stuffing mixture, and mix well. Form tablespoon sized portions into "balls", pressing them well to bind. Drop these into the soup once it starts boiling. 
Then lower heat to a simmer and add the shredded turkey. Cover the pot and simmer for ten minutes. Stir in lemon juice just before serving. Enjoy! 

Tuesday, November 22, 2011

Fun Thanksgiving Treats

I have some time on my hands this Thanksgiving with it being just the two of us. So, I thought I'd make a few treats to share with coworkers, neighbors and such folks. I mean, why wait until Christmas, right? :) I saw a photo for these pretty edible acorns online a little while ago and thought they were too cute to pass up! And the pilgrim hats, well, what can I say. We just so happened to have the ingredients on hand.


Both of these ended up being so easy and fun to make. Perfect for sharing, and almost too cute to eat. I do hope you enjoy these quick treats:

Edible Acorns


You will need:

Donut holes
Toffee bits
Bits of Pretzels
Some kind of "edible glue" (peanut butter, nutella, or frosting :)

Spread some of the "edible glue" on the top one-third of each doughnut hole. (By the way, is it "doughnut" or "donut"? I can never tell.) Then dip the gluey top in toffee bits. Lastly add a bit of pretzel for the stem. Store in an airtight container. Enjoy!


Pilgrim Hat Cookies


You will need:

Nilla wafers
Mini Reese's peanut butter cups
White decorator gel
Yellow decorator gel

Unwrap the mini peanut butter cups and place bottom up on each nilla wafer. (Use some of the decorator gel as glue.) Then, with white decorator gel, pipe a band around the base of each mini peanut butter cup and then make the hat buckles with yellow decorator gel. Enjoy!

Thursday, November 10, 2011

Coriander Chicken

I'm having one of those evenings. Stuck indoors, wistfully imagining being someplace else. Maybe someplace warmer. Someplace more exotic. Do you ever get that way? If you're a fellow foodie, you also understand when I say that the longing to be someplace warm and exotic is usually accompanied by a craving to eat something..."different". If you're having one of those days too, this dish may be something to try. (This is something so wonderful about Indian food...the incredible variety of dishes you can enjoy.)

It was really this longing, combined with my Kerala heritage that inspired me to put together this dish for dinner. It's a recipe that I have been making for years, one that quickly became a household favorite. This one is not quite a curry, and not quite a dry dish but, rather, something in between. The Malayalam word for this is called "piralen" and can be made with really any kind of meat, and uses an array of fragrant spices. As I mentioned, traditionally this dish has less gravy, but I have adapted it to my kitchen and the apparatuses available to me (no, I do not have a mud pot or open fire to cook these things in!) If you would prefer to try something a little bit closer to the original version, you might want to remove the chicken once cooked and continue cooking down the gravy until it is drier then put the chicken back.


Coriander Chicken


You will need:

1.5 lbs of chicken, thighs or breasts cut into manageable pieces
3 tbsp corriander powder
1 tbsp red chilli powder
1/2 tsp pepper
1/2 tsp cumin powder
1/4 cup finely chopped red or white onion
2 tbsp minced garlic + 1 tbsp finely chopped ginger (or 3 tablespoons ginger-garlic paste)
2 tbsp vinegar
1 teaspoon salt (or more or less to taste)
2" piece of cinnamon
8 cloves
2 whole green cardamoms
1 star anise
2 cups or more water for the gravy

Grind or pound together the cinnamon, cloves, cardamoms, and star anise. Mix this and all other ingredients except chicken and water to form a marinade. Add the chicken, mix well to coat with the marinade mixture and let marinate for at least 1 hour covered in the refrigerator. Then, transfer to a heavy-bottomed skillet or saucepan, add enough water to cover the meat and bring up to a boil. Then, cook uncovered on low heat until done. This took about 40 minutes on my stove for chicken thighs (boneless skinless chicken breast cut into bite-sized pieces will take much less time, probably around 20-25 minutes.) Serve as a curry with rice or flatbread. You can also remove the chicken once cooked and continue cooking down the gravy until it is drier, as the dish traditionally calls for. Enjoy!

Sunday, October 9, 2011

Lemon Curd Tartlets

I am only slightly ashamed to say that a television show was the inspiration behind my making this dessert. Actually, one episode of a TV show. We are huge fans of the 90s sitcom "Friends". We have watched every episode multiple times, and the show never ceases to keep us laughing for hours on end. And, of course, this is completely useless information for normal people, but we would probably beat a lot of you at any sort of "Friends" trivia game (anyone challenge? :)  Anyway!  In a particularly classic episode guest starring Jon Lovitz, his character (sky high at the time, mind you) hears the word "tartlets", and repeats it a few times, in wonder, then says "...word has lost all meaning." Of course, this sends us into a tizzy of laughter every single time we watch that episode (or sometimes even by just remembering it). In honor of that episode, I am actually doing something I'm not particularly fond of so don't do that often - baking - "tartlets".

All anecdotes aside, these are pretty darn good. Very easy to make these using a mini muffin pan. My tartlet pastry is a bit sweet, but not too sweet. And the lemon curd has just got that perfectly lovely lemony taste. I only make this about once a year because I really cannot resist eating them all. You should try it too :)


Lemon Curd Tartlets


You will need:

For the tart shells-
1 1/2 sticks unsalted butter, room temperature
1/2 cup sugar
1/2 teaspoon pure vanilla extract
1 3/4 cups flour
1/4 teaspoon salt

For lemon curd-
3 large lemons, room temperature
1 1/4 cups sugar
1 stick unsalted butter, room temperature
4 eggs, room temperature
pinch of salt

Tart shells:
Preheat oven to 350 F. In a large mixing bowl, mix the butter and sugar together until just combined. Add vanilla extract. In a separate bowl, sift together the flour and salt, then add to the butter-sugar mixture. Mix until the dough starts to come together. Remove to a floured surface and shape into a ball. Then break off marble-sized pieces of dough, roll between palms, flatten into discs and press each into the cups of a mini muffin pan, just until they come up the sides a bit. You should have enough dough to make about 32-36 tartlets. Press a fork into the base of each tartlet one or two times so steam can escape and they don't puff up. Bake the tartlets in a preheated 350 F oven for 15 minutes. If the edges start to brown too quickly cover the mini muffin pan with a sheet of aluminum foil in the last 2-3 minutes of baking. Cool the pan completely before removing tartlets. Use a finger to push them out, they should come out very easily.

For the lemon curd:
Remove the lemon zest with a vegetable peeler or micro plane grater, remember to avoid the white pith (will give a bitter taste). Then, juice the lemons so you get enough to make 1/2 cup of juice and set this  aside. In a food processor, mix the lemon zest and sugar until combined. The zest should be finely minced. Then, in a bowl, cream together the butter with the sugar-lemon zest mixture. Add the eggs, one at a time, followed by reserved the lemon juice and salt. Mix for a minute or two, until well combined.
Then pour this into a saucepan and cook over a very low heat, stirring constantly, until thickened. This may take about 12-15 minutes depending on the heat. Lemon curd normally thickens at a temperature just below a simmer. Remove from heat.

Fill the tartlet shells with the warm lemon curd and leave it alone (if you can resist the urge to try one) until it sets at room temperature. Will keep in an airtight container in the refrigerator for several days. This freezes pretty well too, so it's a good make ahead dessert. Enjoy!

Note: you can alternatively make the tart shell using a regular tart pan with a false bottom. It will take a bit less time, but then you'd have to cut the whole tart into wedges to make servings and that's just so boring, no?  :)

Thursday, October 6, 2011

Curried Cauliflower Soup

Seven more months of rain?  I have a feeling we're going to be having SOUP for dinner quite a bit!  This is another easy one worth trying, a good comforting soup for rainy and cold evenings.  This recipe makes a big batch, so if you are cooking for just two there will be plenty left over for the next day's lunch.  Try it!

Curried Cauliflower Soup


Serves six to eight.

You will need:

1 whole cauliflower, cut into florets
1 small white or red onion roughly chopped
3-4 cloves garlic
1 tablespoon minced fresh ginger
5 cups vegetable broth
1 (14 ounce) can coconut milk (light is fine)
1 tablespoon yellow or red curry paste
1 pinch turmeric
1/4 teaspoon coriander powder
2 tablespoons vegetable oil
optional - salt to taste (if broth is unsalted)
optional - fresh cilantro for garnish

Saute onions and garlic in the oil in a large pan on medium heat, until softened, about 4-5 minutes. Add the cauliflower and continue to cook on  medium heat until florets are halfway cooked, about 4 minutes, adding a little of the vegetable broth if necessary to keep the vegetables from sticking to the bottom of the pan. Add curry paste, turmeric, and coriander powder and stir well. Then add all the vegetable broth, coconut milk and bring to a boil. Then reduce heat to low, cover, and simmer for 15 minutes. Puree the soup (carefully) in a blender in batches or with a stick blender. Simmer before serving. Serve warm, topped with a little fresh cilantro if desired. Enjoy!

Monday, October 3, 2011

Easy Lemony Tortellini Soup

I don’t care if you say you can't cook, or say you don’t have time....ANYONE can boil water! Which is all this soup entails. This is an easy to make, great alternative to chicken noodle soup, perfectly comforting for these cozy Fall evenings. As a bonus, this uses the most interesting pasta ever - Tortellini! Easy to put together at the last minute for lunch or dinner. Seriously….try this:


Easy Lemony Tortellini Soup


Serves four.


You will need:
4 cups vegetable or chicken broth
1 pkg dried tortellini (3 serving pack, you will find it in the pasta aisle in grocery stores) cooked per package instructions
1 tablespoon lemon juice
1 tablespoon chopped fresh parsley
1/2 teaspoon freshly cracked black pepper
optional - salt (skip if broth already contains salt)
optional - 1 teaspoon lemon zest (this gives the soup amazing flavor!)
 
Heat the stock to a boil and add cooked tortellini. Stir in lemon juice (and optional lemon zest). Divide equally among four soup bowls, top with parsley, and pepper. Serve immediately, with an extra lemon wedge if desired. Enjoy!

Monday, September 19, 2011

In Season Dessert: Blackberry Pie

There is a trail not far from where we live, that is just teeming with wild blackberry brambles. Plenty of good fruity blackberries, ripe for the picking. (Have I mentioned lately how much I love living in the state of Washington?)  I'm fairly certain we will be heading back to that trail to do a little more picking before they all disappear for the next nine months with the looming onset of "rainy season".

So, finding ourselves with a free morning last weekend, the husband and I set out with tupperware containers and braved the thorny bushes to pick a whole bunch of these beautiful ripe wild blackberries. And then I thoroughly washed and cleaned the berries in order to spend the afternoon experimenting with blackberry pie recipes. This particular recipe is as simple as it gets, with not much more than fresh fruit, sugar, and a hint of lemon. Not too sweet, just sweet enough.  And so easy, you need to try it.


Blackberry Pie


Makes 8 servings.

For the filling you will need: 
5-6 cups blackberries, washed clean, and patted dry
3/4 cup white sugar (or 1/2 cup, varies with how sweet the berries are. For store bought berries 1/2 cup should do it)
3 Tbsp all purpose flour
1 tablespoon lemon juice
1 teaspoon lemon zest
1/4 teaspoon ground clove
1/4 teaspoon ground nutmeg
1/4 teaspoon ground cinnamon
1 Pie crust - you can follow my standard sweet pie crust recipe that I have been using for years or use store bought)

For the pie crust you will need:
2 1/4 cups all purpose flour
2 sticks butter (1 cup)
1 tablespoon sugar
1/2 teaspoon salt
1/2 cup or more ice water
Optional - eggwash (1 egg+1 tablespoon water)

Pie crust:
Mix the flour, salt, and sugar in a large bowl. Then cut the butter in and combine until the mixture is grainy and resembles coarse sand. Then, add ice water one tablespoon at a time and mix well until dough is firm and there is no dry flour remaining. Separate dough into two halves. Flatten each half down into 3-4" discs, cover each with plastic wrap, and refrigerate for at least 1 hour (8 hours or overnight is okay too).

Filling:
Combine sugar, lemon zest, lemon juice, and flour, and sprinkle this over the blackberries. Stir well so the berries are slightly crushed and well coated with the sugary mixture. Set aside for 30 minutes.

Preheat oven to 375°F. 

Roll out pie dough on a lightly floured surface and line the bottom of your pie pan with the dough. Roll out the second ball of pie dough for the top crust. Spoon the berry mixture into the dough-lined pie dish. Place the second rolled-out pie dough crust on top of the pie. Trim off the edges of the pie crust to fit the pie pan. Score an "X" in the top with a sharp knife to create air vents for the steam to escape. Place the pie on the middle rack of the oven. Put a baking sheet on the lower rack to catch any juices that might bubble out of the pie while it's cooking - and this WILL happen, trust me!  Bake the pie at 375 F for 40 minutes or until  crust is golden-brown and filling is bubbly.  If necessary, protect the pie with aluminum foil if it looks like the edges and tops of crust are getting burnt. (Optional - just before putting the pie in the oven, you can brush the top crust with eggwash. The eggwash will give the pie that golden "pie glow". Note that this step is completely unnecessary and will not affect the flavor of the pie, the eggwash just makes the crust look pretty.)
When done baking, remove from oven and place on a wire rack. Cool completely before serving. Enjoy!

Note:  the recipe I have written above is for a regular crust, but I love the look of the lattice crust. If you've never tried a lattice crust, I would encourage you to try it. It is much easier than it looks, and so pretty! 

Wednesday, September 14, 2011

Samosas

Samosas are probably the most delicious Indian snack, ever. At least, according to a lot of people I know. And samosas are the most requested Indian dish in my circle of friends. Seriously, even people who don't like Indian food will eat these delicious little deep fried savory treats.

There are literally hundreds of different ways to make the samosa filling, depending on where you grew up or who you ask, but here's a simple recipe that I have been making for years and has become very popular with friends. This filling is an all veggie option, and is really tasty with just the right amount of spice and tangyness. The pastry is just about perfect too. (If you don't want to go to the trouble of making the pastry at home, a couple of shortcuts are wonton skins or frozen puff pastry. Both are easy substitutes and cut your prep/cooking time significantly.) Whether you choose the shortcut methods or the original, prep is still labor intensive so make sure you have plenty of time before getting started. Hope you enjoy this recipe!

Samosas


For the samosa filling, you will need:

2 Tablespoons vegetable oil
1/2 teaspoon cumin seeds
1/2 teaspoon mustard seeds
2/3 cup finely chopped onion
2 Tablespoon chopped fresh cilantro
1 Tablespoon dried mango powder, or 2 Tablespoons lemon juice
1 teaspoon cumin powder
1 teaspoon coriander powder
1 teaspoon salt
1 teaspoon red chilli powder
5 medium potatoes, peeled, cut into 1/2" pieces and boiled for 15 minutes
1/4 cup peas (optional)

Heat the oil in a large skillet on medium heat. When oil is hot, add the cumin seeds and mustard seeds. When the seeds pop, add onion, and cilantro. Sauté until the onion becomes translucent, about 3-4 minutes, then add dried mango powder or lemon juice, cumin and coriander powder, salt, and red chilli powder. Sauté a few minutes just until the spices have cooked a bit, then add the cooked and drained potatoes, and the optional peas. Mix well and sauté just until heated through, them remove from heat and set aside.

To make the samosa pastry, you will need:

2 cups plus 2 tablespoons all purpose flour
2 1/2 Tablespoons vegetable oil
1/2 teaspoon salt
Water

Mix the flour, oil and salt in a mixing bowl, then add water gradually (about 1/4 cup at a time) until the dough holds together, and knead well. Roll into a ball and cover with a damp paper towel. Let this dough rest for about 20 minutes. Then, break off walnut sized balls of the dough, and roll out into 5-6" circles. Cut each circle in half. Fold each half-circle to form a cone. Fill the cone with about a spoonful of the potato mixture. Press the samosa between your palms to remove air pockets. Moisten the edges with some water, and seal.

Deep fry the samosas in a lot of oil (at least 2" deep) until golden brown, turning twice; drain. Serve hot plain or with your choice of chutney (sour chutneys are best), or preferred dipping sauce. Enjoy!

Monday, August 29, 2011

Green Goodness Smoothie

Drinkable green goodness. It's is my new favorite breakfast. This yummy smoothie (or juice?) is extremely filling and gives me a solid portion of my required daily dose of fruits and veggies, and it's fresh, cold, and delicious! I can already hear the mental "eww", but try it before passing judgement  :)

Green Goodness Smoothie


You will need:
1 granny smith or golden delicious apple, cored (but not peeled)
2 cups fresh spinach leaves
1/3 cup orange juice
1 teaspoon honey
2 or 3 ice cubes
optional - 3-4 mint leaves (adds cool refreshing flavor!)

Blend all ingredients. Pour into glass. Enjoy!

Monday, August 22, 2011

Blueberries and Cornbread. Who knew?

I needed to come up with some sort of salad to contribute to a Barbeque with friends last week. As it so happened, I had plenty of fresh blueberries on hand so a blueberry salad wasn't far from my thoughts.  Actually, I was thinking more of a blueberry and cornbread type of dish. I've had perfectly good blueberry cornbread muffins before, so...why the heck not?!?  So, I experimented with it, a whole thirty to forty-five minutes before our dinner (which, of course, left plenty of room to run and grab a bag of chips should this epic experimental dish have completely failed.)

But, I put it together and found it to be scrumptious.  It is much less of a salad, and in fact, practically dessert.  Don't cringe at the list of ingredients. Trust me, it truly is a delicious combination of things. The group agreed...as there was hardly any evidence to bring home. So, here you go!


Blueberry Cornbread Salad


You will need:

One 8x8" pan's worth of cornbread, cubed (crumbled is fine too)
1 pint of blueberries
2/3 cup whole roasted cashews (or hazelnuts, if you prefer)
1/4 teaspoon paprika
1/4 teaspoon black pepper
1/4 teaspoon salt
2 tablespoons olive oil
2 tablespoons lemon juice

Mix all together - yes, trust me. Serve immediately. Enjoy!

Wednesday, August 10, 2011

Summer Strawberry Salad

Summer.  Strawberries.  Happiness!

Summer Strawberry Salad


Toss it all together:   4 cups baby spinach, 1 1/2 cups sliced strawberries, 3 tablespoons crumbled goat cheese, 2 tablespoons chopped walnuts, 2 tablespoons balsamic vinegar. Enjoy!

Wednesday, August 3, 2011

Roasted Pears

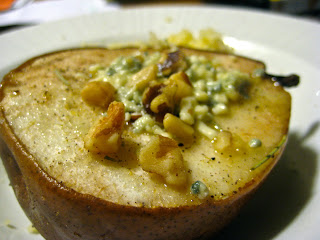
Those who know me well know that I will find any excuse to take something naturally sweet and make it savory. Pears, toasty walnuts, and flavorful blue cheese. (Is it "blue" or "bleu"? I always forget what is appropriate when it comes to the word in food not French.) A really simple side dish, and an excellent way to incorporate some fruit into your dinner. Don't you think?

We had this for dinner a few nights ago, with cous cous, and, not only was it ridiculously easy to put together, it also turned out to be quite tasty. As a bonus, I was successfully able to use up the two remaining pears from the fruit bowl before they went bad. Definitely a plus. Anyway, here is the utterly simple recipe, do try it:


Roasted Pears, with Blue Cheese and Walnuts


You will need:

2 pears, halved
1 tablespoon extra virgin olive oil
1/4 teaspoon black pepper
1/4 teaspoon salt
1/4 teaspoon dried rosemary
2 tablespoons chopped walnuts
2 tablespoons blue cheese 

Preheat oven to 375 F. Coat a baking dish with cooking spray, and arrange the pear halves cut side up in it. Brush olive oil over pear halves, and sprinkle on the salt, pepper and rosemary. Bake at 375 for 30 minutes. Then, put a little bit of the blue cheese and walnuts over each pear half and bake for another 15 minutes, until pears are tender. Enjoy!

Wednesday, July 27, 2011

Fish Curry

I love my Kerala heritage and culture. And I especially LOVE this dish. It is easy to make, involves fish, is bright red in color, and is very spicy. What's not to love? I should actually title this post "Spicy Kerala Fish Curry". (Or "meen vevichathu", as it is known in Malayalam, my native tongue.) A very typical dish of the state of Kerala, from where my family hails, this is traditionally cooked in an earthen pot over a flame for a long time. I don't have an earthen pot so I just use my little dutch oven and that works just fine. Actually, this works out better because I always double or triple the recipe so we can enjoy the leftovers during the week. And, trust me, this is one of those dishes that always tastes better after a day or so.

Let me preface the rest of this post by saying that while I love this dish, I have had to modify it from the traditional recipe. Usually, the case is that I find myself short of some of the specialty ingredients used in the traditional version, except for which the recipe is identical. You may be wondering about these specialty ingredients I seem to be so afraid of - the truth is I am not afraid of them. I simply don't buy them because I use them for one or two things, then put them in the back of the pantry or refrigerator or freezer and promptly forget about them until the next purging of the kitchen - during which I grab armfuls of the expired stuff and throw them out. Such a waste. So I haven't stocked these things in years. In most cases I find substitutes that work well enough. However, since I so rarely do this, I am going to throw a curve ball your way for this recipe, where a substitute is just not going to be the same.  Missing ingredients notwithstanding, I dare you to try this recipe for yourself and tell me it's not superb  :)

Meen Vevichathu
(Spicy Kerala Fish Curry)


You will need:

1 lb good fish (cut into bite sized pieces)
3 teaspoons red Chilli powder (soak chilli powder in enough hot water to make a paste)
1/2 teaspoon fenugreek seeds
1 teaspoon mustard seeds
1/2 cup finely chopped onion
3 cloves finely chopped garlic
1/2 teaspoon finely chopped ginger root
- now I'm going to throw that curve ball in your face - go to your nearest Indian store, and ask them for something called "Kudam Puli", buy the smallest package they have - use two 1"pieces for this recipe, soak in a small bowl, in just enough hot water to cover it.)
4 tablespoons Vegetable oil (traditionally, coconut oil is used, but vegetable oil is just fine)
1 teaspoon salt - or more to taste
2 cups water, just enough to cover the fish.

Heat oil over medium heat in a dutch oven or medium sized pot. Add mustard seeds and fenugreek seeds, they will start to crackle and sputter in less than a minute. Then stir in onions, sauté for two minutes, add ginger and garlic and fry for about two more minutes. Add the red chilli paste to the pot and fry until oil is floating on the top, about two more minutes. Add the kudam puli and the soaking water to the pot followed by two cups of water, or as much as is needed to cover the fish. Let it come to a boil, then add the fish pieces and then add salt and put the lid on the pot. Turn heat down to low. Do not stir! Let cook like this for about ten minutes or until the fish is fully cooked, and the oil is floating on top. Serve with rice and veggies. Enjoy!

Monday, July 25, 2011

Blueberry Martini

Blueberry Martini. Do it.  I'm slowly discovering that "summer" in the Seattle area lasts only about 5 minutes. Thankfully, a martini is just as good at any time of year.

Blueberry Martini


You will need:

For the blueberry sauce -
2 cups fresh blueberries
2 tablespoons fresh lemon juice
1/3 cup white sugar

Mix blueberries, lemon juice, and sugar together in a food processor until smooth, then strain the pulp through a mesh strainer. Discard the mucky seeds and stuff. You'll be left with a smooth seedless blueberry sauce that has a syrupy consistency. This makes about 1 cup of sauce. Store in an airtight container in refrigerator for up to one week.

For the martini -
2 tablespoons blueberry sauce (per above)
1 oz. very cold vodka
2 or 3 fresh mint leaves

Put a couple ice cubes in a martini glass. Pour the blueberry sauce into glass, and pour vodka on top. Serve garnished with mint leaves. Enjoy!

Monday, July 18, 2011

Stir Fried Radish

Radish. Yum! This crunchy vegetable tastes so good and fresh raw, that I hardly ever cook with it. But this recipe is really easy, and has those special Indian flavors. If you are looking to try something different with your summer crop of radish, do try this!

Stir Fried Radish


You will need:

2 tablespoons vegetable oil
1/4 tsp mustard seeds
Radish, very thinly sliced, about 2 cups
1/2 cup white onion, finely chopped
2 cloves garlic, crushed
1 teaspoon red chilli powder
1/2 teaspoon cumin seeds
1 teaspoon coriander powder
1/2 tsp lime juice
1/2 teaspoon salt (or more to taste)
1/4 teaspoon Garam masala

Heat oil in a wide skillet on medium heat, then add the mustard seeds. When they start sputtering, add radish spread out in skillet evenly, fry on medium heat until slightly softened, about seven minutes. Then add the onions, garlic, chilli powder, coriander powder, cumin, lime juice and mix really well to combine. Sprinkle on salt. Then, add the garam masala and give it a good stir. Serve hot with rice. Enjoy!

Thursday, July 14, 2011

Memories of Mac n' Cheese

Macaroni and Cheese occupies a somewhat delicate place at our dining table. My husband and I both have had ups and downs with this classic American comfort food. For him it involves recurring nightmares of the gooey glop that they dared to call Mac n' Cheese and served to him in his elementary school cafeteria. Forcing himself to try one bite before escaping the teacher's watchful eye to hide under the table pretending to tie his shoelaces while actually shoveling the remaining gummy mass on his plate into the pockets of his jeans, one fistful at a time, quite inadequately sheathed in layers of paper napkins. My first Mac n' Cheese experience was in my freshman year dorm, with the "mac n' cheese in a box" variety (brand shall remain unnamed), that resulted in a gluey mess of macaroni shells held together with  cheese-like product that was an unsightly shade of orangey-yellow. Maybe I did it wrong, but I won't go there ever again.

We have since moved onto more civilized versions of macaroni and cheese, and I now delight in its endless culinary variations. This Bacon Bleu version of Mac N' Cheese is definitely a favorite of mine, and is such an easy recipe too. A classic combination of flavorful bacon, and bleu cheese. I watched a lady on television make a version of this once and have adapted it to be my own which, in this case, means fewer calories. Anyone who has watched this particular lady with the butter knows why. I also added some sliced zucchini for color, and crunch.

A few notes on the recipe:
Bleu cheese is definitely strong, so I would recommend substituting part of it with something milder if you don't like bleu cheese so strong. Also, I use the term "crumbled bacon" below but the truth is:
a) I am terrible at crumbling bacon as most of it disappears into my mouth, and
b) I don't actually "crumble" it, more like rip it into one inch chunks.

Bacon Bleu Mac N' Cheese


You will need:

2 cups uncooked elbow macaroni
2 tablespoons butter
1 teaspoon salt
1/2 teaspoon black pepper
1/2 cup zucchini sliced to about 1/4" thick
3/4 cup milk
1/3 cup all-purpose flour
1/2 cup plain yogurt
1 cup bleu cheese, crumbled
1/2 cup freshly shaved Parmesan
2 slices bacon, cooked and crumbled

Cook bacon, crumble into small pieces and set aside. Bring a large pot of water to a boil. Add salt, then add the macaroni and cook according to package instructions; drain and set aside.
In a saucepan over medium heat combine butter, salt, and pepper. Once butter has melted, stir in milk, flour, yogurt, bleu cheese and Parmesan. Then add zucchini and stir for about 1 minute, just until heated through. Then add cooked macaroni into cheese. Lastly, toss in the crumbled bacon and give it a good stir. Serve hot. Enjoy!

Monday, July 11, 2011

The Most Awesome Summer Watermelon, Ever

Is it salad, is it dessert? Or is it happy hour? Call it what you will, this watermelon is delicious and certainly quenches that need for something cold and fruity on a warm day (of course, for those of the appropriate legal drinking age). Oh, right, did I not mention that this is infused with vodka?  :)


Summer Watermelon


Serves 4

You will need:

6 cups 1" chunks of watermelon
1/2 cup very cold vodka (we keep ours in the freezer)
1/4 cup fresh lemon juice
4 tablespoons white sugar
2 tablespoons fresh mint leaves, torn up

Whisk together the lemon juice, and sugar until sugar has dissolved. Then stir in the vodka. Pour mixture over the watermelon, then add the mint. Gently toss. Chill for at least half an hour before serving. Give it a good stir before dishing up. Enjoy!

Wednesday, July 6, 2011

Butter Chicken (Murg Makhani)

Butter, and Chicken.  Yes, it is really good.

This is an extremely popular Indian dish that can be as spicy or mild as you like, but is typically not very spicy. Certainly not so much that it will sear your taste buds right off. In fact, I made this for a group of friends a few months ago, and many in the group said it reminded them of Chicken Paprikash - quite similar in its use of ingredients. So, since this is a close cousin to the popular American dish (if you're familiar with it) you will know that it isn't that spicy. Do try it!

Butter Chicken (Murg Makhani)


Serves 8

You will need:

2 boneless skinless chicken breasts, cut into 1" pieces
Juice of 1 lime
1 heaped tablespoon red chilli powder (adjust to suit your taste)
3 tbsps veg oil
2 onions chopped
2 cloves garlic, minced
1 tsp ginger, finely chopped
10 whole black peppercorns
2 tablespoons garam masala
2 tsps coriander powder
1 tsp cumin powder
1/4 tsp turmeric powder
1 cup plain nonfat yogurt
4 tablespoons tomato paste
2 cups chicken stock
2 tablespoons fresh chopped cilantro, plus more for garnish
3 tbsps butter, brought to room temperature
Salt to taste

Mix the chicken, lime juice, salt and red chilli powder in a large, non-metallic bowl. Cover and allow to marinate for 1 hour in the refrigerator. Whisk together the yogurt, garam masala, peppercorns, coriander, cumin and turmeric powders and add them to the chicken. Allow to marinate for another hour in refrigerator.
Heat the oil in a deep pan on medium heat. When hot, add the onions and fry until golden brown. Then add the ginger and garlic. Fry for a minute.
Remove the chicken pieces from the marinade mix (save the marinade! you will need it shortly) and fry the chicken pieces till cooked through, (for 1" size pieces this would take about 5 minutes on medium heat on my stove - the cooking time will vary for you). Now add the tomato paste, chicken stock, and reserved marinade mix to the chicken. Cook until the chicken is tender and the gravy has thickened and reduced by about half.
Then, melt the butter and pour it over the chicken, stir to combine. If desired garnished with cilantro, and serve hot with rice or any flatbread. Enjoy!

Wednesday, June 29, 2011

Summer Vegetable Risotto: An Hour Well Spent

Cooking keeps me sane.  So making this slow, intense risotto for dinner tonight was just perfect. 

Risotto is one of those dishes that takes forever to make, and, unfortunately, there is no shortcut around the method.  While I personally equate this to a kind of yoga, I completely understand that not everyone wants to stand in the kitchen pouring and stirring constantly, for thirty minutes straight. However, if you ask me, the end result is worth it!  So, if you're going to make any risotto at all, let it be one that has intense flavors, and is creamy to the last bite...like this one.  Earthy farmer's market flavors abound in this Summer Vegetable Risotto.  We didn't hesitate one bit in lapping up our dinner. Enjoy!

Summer Vegetable Risotto


Serves 6

You will need:

1 lb fresh asparagus, trimmed and cut into 1" pieces
1 lb fresh zucchini, halved and sliced 1/4" thick
2 tablespoons extra virgin olive oil
2/3 cup finely chopped red onion
3 cloves garlic
1 cup arborio rice (in a pinch, short-grained rice will do!)
1/4 cup good dry white wine
4 1/2 cups vegetable stock
1 tablespoon butter
1/2 cup shaved fresh parmesan
optional - chopped fresh parsley
optional - fresh cracked black pepper

Bring a large pot of water to a boil, and cook the asparagus and zucchini for about 3 minutes, just until crisp tender. Drain into a colander and run cold water over the veggies immediately to stop them from continuing to cook. Set aside.
Meanwhile, heat up the vegetable stock in a saucepan and keep simmering nearby.
Heat the oil in a large saucepan or skillet over medium heat, then saute the onions and garlic for about 2-3 minutes, just until onions are translucent. Add arborio rice, stirring constantly for about 1 minute. Then add the white wine and stir until it has fully evaporated, about 2 minutes. Then ladle in about 1 cup of the simmering vegetable stock. Stir the rice constantly until the stock has been fully absorbed, about 5 minutes. Then add 1/2 cup more of the stock, stirring until fully absorbed. Repeat this process, adding about 1/2 or 3/4 cup of stock at a time, until all but 1/4 cup of the stock has been added and absorbed into the rice, about 25 minutes total. Add in the asparagus and zucchini and stir for about 1 minute, just until warmed through. Remove risotto from heat, and stir in the butter and parmesan. Last, add the remaining 1/4 cup of vegetable stock and give it a gentle stir. Serve warm, garnished with parsley and freshly cracked black pepper. Enjoy!

Note: I don't add salt, because there usually seems to be enough salt from the cheese and vegetable stock. However, if you must add salt, about 1/2 teaspoon added to the saucepan should do it!

Monday, June 27, 2011

Hariyali Chicken (Green Chicken Curry)

This one is a very popular North Indian dish that has become a favorite in our house for two reasons: 1) because we love anything green, and 2) because it packs terrific flavor and has the perfect level of spicy-ness! It cooks up easily in a big batch and reheats wonderfully. Do try it.

 Hariyali Chicken (Green Chicken Curry)


Makes 6 servings

1 1/2 cups fresh cilantro
12-14 large mint leaves
2 jalapeno peppers
1/2 of a medium-sized red onion
1 1/2 " piece of ginger root
6 cloves garlic
1/4 cup water, plus additional 1/2 cup water
2 tablespoons vegetable oil
2" piece cinnamon stick
4 cloves
2 teaspoon cumin powder
1 teaspoon coriander powder
2 cups of boneless chicken breast or thigh, cut into bite-sized pieces
1/4 cup heavy cream, OR 1/4 cup plain yogurt whisked into a smooth consistency
1 teaspoon salt
1/2 teaspoon pepper

In a food processor, grind together cilantro, mint leaves, jalapeno peppers, red onion, ginger, and garlic, until it forms a fine paste, gradually adding the 1/4 cup of water to it in between mixing. Set aside. Heat the vegetable oil in a large skillet on medium heat. Add the dry spices and fry for 30 seconds. Then add the green paste and fry for about 2 minutes, until the paste becomes thick and fragrant. Then, add the chicken pieces and mix thoroughly to ensure all pieces are coated well with the green mixture. Add the 1/2 cup of water, and bring to a boil. Once it is boiling, let cook uncovered on low for about 20 minutes until the chicken has cooked through and curry has thickened a bit. Remove from heat and stir in the yogurt or heavy cream. Garnish with fresh cilantro leaves if desired, and serve hot with rice or any flatbread. Enjoy! 

Friday, June 24, 2011

Avocado Margaritas

An Avocado Margarita. Quite possibly the only thing better than a regular Margarita. Perfect on a warm summer evening. Or pretty much at any time of day or year. I skipped dinner altogether last night, in favor of this easy and deliciously hearty frozen green drink!

Avocado Margaritas


Serves 4

You will need:

1/2 cup tequila
1/2 cup margarita mix
2 cups ice
1 avocado
1/2 tablespoon red chili powder
1/2 tablespoon coarse salt
lime

Mix salt and chili powder. Rim four margarita glasses with lime and coat with salt mix. Blend together ice, tequila, margarita mix, and avocado. Pour into glasses. Enjoy!

Wednesday, June 22, 2011

Dreaming of Italy: Prosciutto e Melone (Prosciutto and Melon)

I want to go to Italy. I want to drink Italian wine. I want to eat fresh spaghetti with tomato and basil. I want to sit at a road side café and sip espresso that's as thick as melted chocolate. I want to visit Firenze and stand in awe of the art and architecture of the Renaissance. I want to go to Napoli, and eat authentic Napolitano pizza. I want to stand on a terrace and look out over Rome in all its past and present glory. In short, I want to be Elizabeth Gilbert in Eat Pray Love and do nothing but eat great food and experience "the sweetness of doing nothing”.

So, until this trip to Italy happens, for now, this will do. My homemade version of a classic Italian savory treat, Prosciutto e Melone. Cantaloupe wrapped in Prosciutto. I added just a touch of basil and balsamic vinegar. We enjoyed this treat tonight, and it was so filling, it was basically dinner!

I can practically hear the sounds of the street by the café. After all, in my head I’m in Italy anyway.

Prosciutto e Melone (Prosciutto and Melon)


Really simple to put together, and this can be made ahead of time. All you need is some Cantaloupe, sliced or balled, thinly sliced Prosciutto, a bit of balsamic vinegar, and some basil (optional). Assemble Prosciutto and Melon as shown, drizzle on some balsamic vinegar, and serve. Enjoy!

Monday, June 20, 2011

Summer Parsley Yogurt Dressing

Here's a "perfect for the summer" salad dressing alternative. Very quick to make and it stores well in the refrigerator. Perfect over any salad greens, or even just to eat plain (it's all I can do not to finish off the dressing before it makes to the salad bowl). Enjoy!

Summery Parsley Yogurt Dressing


Makes 8 servings

You will need:
2/3 cup fresh parsley, finely chopped
2 cups plain fat free yogurt
1 clove garlic, finely minced
2 teaspoons lemon juice
1 tablespoon Worcestershire sauce
1/2 teaspoon hot sauce
a pinch of salt

Mix all ingredients together and store in the refrigerator in an airtight container, until ready to serve. Spoon over any salad greens. Enjoy!

Wednesday, June 15, 2011

Prosciutto, Fig, and Goat Cheese Pizza

You might already know this, but, according to research, human beings mostly crave three tastes:  salt, sweet, and fat.  Ergo, this Prosciutto, Fig, and Goat Cheese Pizza satisfies the most serious of food cravings.  I triple-dog dare you to try it!

Actually, there is nothing new or revolutionary about this combination of ingredients. However, the saltiness of the prosciutto, the sweetness of figs, and the creamy goat cheese, are simply elevated to new planes of edible joy by putting it all together on a pizza crust, and baking it to toasty, salty, sweet, creamy perfection.
So simple to put together, a three-year old could help make this (maybe not with the oven part of it!)
Do try it.

Prosciutto, Fig, and Goat Cheese Pizza


Serves 2

You will need:
2 10" flatbread or pre-baked pizza crusts
2 very thin strips of prosciutto (substitute with ham if you must), torn into smaller pieces
8 to 10 dried figs, halved
2 heaped tablespoons goat cheese
fresh cracked black pepper

Preheat oven to 400 F. Place flatbread or pizza crusts on a cookie sheet, sprinkle the prosciutto and figs on top, then crumble goat cheese over that. Add enough fresh cracked black pepper to suit your taste, then bake at 400 F for 12-13 minutes, or until edges of flatbread/crust turn golden brown. Enjoy!

Note: Fresh figs won't be in season for another month in Washington, so I used dried figs which tasted just as good. Either way, get some figs on it!

Tuesday, June 14, 2011

In Season Dessert: Fresh Blueberry Ice Cream

An ice-cream experiment of epic proportions. I made this last week and served it for dessert when we had some family over. Loyal readers (by the way, thank you for reading!) know that I have sort of an obsession with homemade ice cream (click on the "Desserts" label on the right to read some of my older ice cream posts). But this one just took it to a whole new level. Fresh fruit, sugar, cream...and a few other ingredients contribute to this sweet-treat nirvana of sorts. Do try it.

Fresh Blueberry Ice Cream


You will need:
2 cups fresh blueberries
1/4 cup white sugar
1 teaspoon lemon juice
1 cup heavy cream
1/2 cup milk
1 can evaporated milk
1 can sweetened condensed milk

Blend blueberries, sugar and lemon juice until pureed. Whisk blueberry puree thoroughly with heavy cream, milk, and evaporated milk, and condensed milk. Pour into shallow airtight freezer safe containers, cover, and freeze for about one and a half hours (until partially set). Remove from freezer, whisk again for at least three or four minutes, then freeze in covered containers again. Repeat this whisking-partial-freezing process at least twice – this action is what allows the ice cream to become creamy and increase in volume. When done, freeze again for at least eight hours or overnight. Enjoy!

Sunday, June 12, 2011

Pork Chops with Peach Sauce

Summer is almost here, and juicy fresh peaches beckon. One of my favorite fruits, I can enjoy them plain or use them in a sauce, or make salsa with them, and find all versions equally delicious. I love that peaches can be used in sweet or savory interpretations. Pork Chops, on the other hand, are not commonly found on our dinner table, but we will eat them every once in a while - as we did tonight - particularly if they happened to be on sale at the grocery store!
So, this was our easy and quick (I made this in under 20 minutes) dinner to wind down after a weekend of enjoying the sunshine and relaxing. I love the flavor combination of peaches and pork, and this sauce was really, really good! Do try this.

(Note: if you do not eat pork, the same peach sauce can be made and served over chicken. It is just as yummy!)

Pork Chops with Peach Sauce


Serves 4

You will need:
4 boneless pork loin chops
1 tablespoon olive oil
1/2 teaspoon salt
1/2 teaspoon fresh ground black pepper
1/4 cup finely chopped red onion
1 teaspoon dried rosemary
2 peaches, sliced into 8 pieces each
1/2 cup white wine
1/2 cup chicken broth
2 teaspoons honey (brown sugar would be a great substitute, if you prefer that!)
1 tablespoon butter

Heat the olive oil in a large skillet on medium heat. Sprinkle salt and pepper on both sides of the pork chops, then cook them in the skillet on medium heat for about 3 or 4 minutes on each side, or until done. Remove from pan and set aside (keep them warm). Add chopped onions, rosemary and peaches to pan, let cook on medium heat for 2 minutes. Then add the white wine and scrape to loosen all the yummy brown bits from the bottom of the pan. Turn heat up and let cook until the white wine has evaporated a bit, about one or two minutes. Then add the chicken broth, and cook for another 3 minutes. The sauce will have reduced and thickened a bit by now. Remove from heat, then stir in the butter. Spoon sauce evenly over the four pork chops, and serve warm. Enjoy!

Tuesday, May 24, 2011

In Season Dessert: Blackberry Crème Cups

Can you tell that I'm on a fresh fruit dessert kick this week?

There's no ice cream or chocolate in the house this week (which nearly never happens) so, craving something sweet yet not that unhealthy, I came up with this lovely fresh and light dessert that can easily be made on a weeknight - just like I did tonight! We have plenty of blackberries on hand since they are in season, and available in proper abundance at grocery stores around here.

Blackberry Crème Cups


Serves 4

1 cup blackberries
1/4 cup white sugar
1/2 teaspoon lemon juice
1 cup heavy cream
3-4 drops pure vanilla extract

Blend the blackberries, sugar, and lemon juice in a food processor until smooth. You will now need to discard the seeds (otherwise it would be really annoying to have them in your dessert) so pour the mixture through a mesh strainer, pushing it through with the back of a spoon, like so:


The resulting blackberry puree should now have a sauce-like consistency and will smell like fruit heaven. Set aside about 2 tablespoons of this puree for the topping. Then combine heavy cream and vanilla and whisk for about 3-4 minutes, until stiff peaks form. Gently fold remaining berry puree into cream, then divide into dessert cups. Cover loosely and refrigerate at least 1 hour. To serve, drizzle the reserved 2 tablespoons of blackberry puree over the blackberry crème cups. If desired, garnish with fresh blackberries. Enjoy!

Monday, May 23, 2011

Fresh Strawberries With Mascarpone Cheese, and Chocolate Sauce

An easy, timeless dessert made with fresh, in season, Strawberries, Mascarpone cheese, and a touch of chocolate sauce. Delicious, and not so sinfully unhealthy...am I right?

Fresh Strawberries With Mascarpone Cheese, and Chocolate Sauce


Serves 4

You will need:
16 fresh Strawberries
1/2 cup Mascarpone cheese
1 tablespoon honey
1/2 teaspoon orange zest
optional - chocolate sauce

Mix Mascarpone cheese, honey, and orange zest together in a small bowl.  Slice off the green tops of the strawberries, stand them on their heads and make deep slits in a cross pattern.  Fill each with a spoonful of the Mascarpone mixture (use a piping bag for this to make your life easier!  I usually just put the mixture into a ziploc bag and snip the tip off.)  Serve chilled.  If desired, just before serving, drizzle some chocolate syrup over the top. Enjoy!

Tuesday, May 17, 2011

Whole Wheat Pasta with Roasted Eggplant and Parmesan Peppercorn Sauce

I don't even know what else there is to say! It was amazing. Easy to make, and healthful.

Whole Wheat Pasta with Roasted Eggplant and Parmesan Peppercorn Sauce


This is really simple to prepare. I used Indian eggplant, which is much smaller in size, just because I had them on hand but regular eggplant sliced about 1/2" thick would work just as well. Just put the eggplant on a cookie sheet coated with cooking spray, brush with olive oil and sprinkle on some salt and pepper, and bake at 425 degrees F for about 10 minutes. Then make the sauce - but really, any pasta sauce will do! Last, cook the pasta, drain, top with eggplant, sauce, and serve. Enjoy!

Sunday, May 15, 2011

Som Tam (Thai Salad)

Simple ingredients come together for a fresh and exotic salad.

In college, I spent a lot of time at the home of my very first roommate who ended up becoming a close friend too. Her mother is from Thailand and I had the chance to eat all sorts of delicious homemade Thai food, including something called Som Tam which is a popular Thai salad made with finely julienned raw papaya, thai green chilies, and a few other things. I immediately fell in love with it! A few years ago, my husband and I went to visit my friend and her own family came to visit as well. So I had the opportunity to eat homemade Som Tam again, and this time I actually paid attention to how her mother made it and learned how to make it on my own! She didn't have any raw papaya available at the time so she used cucumbers instead and I have been making it this way very often ever since. My husband and I both really love this salad. It is fresh, very tasty, and spicy. Simple ingredients come together for a really fresh and exotic salad.

Som Tam (Thai Salad)


Serves 8

You will need:
2 cucumbers, medium sized, peeled and finely julienned
2 roma tomatoes, diced
2 thai green chillies (can substitute serrano or jalapenos in a pinch)
3 tablespoon chopped fresh cilantro
Optional - 1 tablespoon dried shrimp, or dried crab
4 tablespoons fish sauce
4 tablespoons lime juice

Mix everything together in a large bowl and let sit covered in refrigerator until ready to serve. The longer it sits (usually at least one hour or so), the more potent the flavors and the spice! I usually make a large batch of it so we can make the most out of all the time it takes to chop and prep, and get a lot of salad out of it. Enjoy!

Note: Som Tam is traditionally served with sticky rice, which is how we always eat it, and this is available at all asian grocery stores (you steam it in a bamboo steamer, very easy to make.)

Friday, May 13, 2011

Pepper Fried Beef

Carnivore friends, this one is especially for you!

This dish can stand up to two bold claims:  1) the best fried beef ever, and 2) Indian food like you've never had it. My husband - who is non-Indian - ranks this dish in his top five favorite foods of all time. In fact, he often asks, "when are we having that charred beef thing?"  Much to his credit, it didn't take him long to learn the actual Malayalam name for the dish, and he says it so beautifully!

I hope you will cherish the dish, and savor it as much as I do!

I hardly ever cook with beef in the house, except for this fried beef dish, and ground beef occasionally. This is essentially my mother's recipe, but when I make this I always leave out a couple of ingredients from the traditional Kerala version either due to lack of easy availability here, or my own laziness to go find them, or some combination of both! By my standards this dish takes a painfully long time to put together (about one hour total, between prep time, and cooking time) but it is sooooooooooooo worth the time. An added bonus - you can make bulk batches of it to freeze in smaller portions and later just fry each portion when needed.

Pepper Fried Beef (Erachi Olathiyathu - in Malayalam, my native tongue)


Serves 4

You will need:
Beef cubes 1 lb
Red or white onion diced ¼ cup
Garlic, 3 cloves crushed
Ginger root ½” piece
Unsweetened Coconut flakes 1 tbsp
Salt, 1 teaspoon or to taste
Veg oil ¼ cup, divided
¼ cup white vinegar

Dry spices:
Coriander powder 1 heaped tbsp
Red chilli powder 1 heaped tsp
Black pepper powder 1 heaped tsp
Cumin powder ½ tsp
Aniseed ½ tsp
Cloves 2
Cinnamon, 1 small piece

In a food processor, or using a mortar and pestle, grind together all the dry spices with the vinegar and keep aside. Then grind ginger/garlic and keep aside.
Fry onions in a skillet in very little oil, until golden brown. Add the ginger/garlic paste and sauté till the raw smell goes away. Add the dry ground spices and sauté for a couple of mins. Add coconut and sauté. Add the beef and stir well. Add salt to taste. Add about a cup of water, or enough to cover half the beef, cover the skillet and cook on low until beef is done, about 30 minutes. (Note: If you have a pressure cooker, using it for this is a much faster cooking method than using a skillet. If you prefer to use a pressure cooker, add just enough water to cover and cook the beef and pressure cook till done – normally takes about 15 minutes after first steam).
When cooked, remove beef with a slotted spoon, and discard any remaining liquid. (Note: at this point you can freeze the beef in baggies and fry a little at a time when you need to.)
To fry, heat up the oil in a clean, dry, skillet and fry the beef on medium-high until crispy, and dark brown, almost black in color. Serve with rice and any other side dishes. Enjoy!

Monday, May 9, 2011

Baingan Bharta (Spicy Roasted Eggplant)

Baingan Bharta is an extremely popular Indian dish that is flavorful and fragrant. The main ingredient is eggplant (baingan) roasted then cooked with an array of spices. Usually, the eggplant is roasted over an open flame (gas stove owners rejoice!) but I have adapted it to the electric stovetop in my new abode.

Baingan Bharta (Spicy Roasted Eggplant)


Serves 2

You will need:
1 whole Eggplant (about 1/2 lb)
1 large roma tomato
1/2 cup finely chopped red onion
1 serrano pepper, finely chopped
1/4 inch piece of ginger
3 tablespoons veg oil
1 teaspoon cumin seeds
1 teaspoon coriander powder
1/2 teaspoon turmeric
1/2 teaspoon red chili powder
1 teaspoon salt, or to taste
2 tablespoons tomato paste
2 tablespoon chopped parsley or cilantro to garnish

Preheat oven to 400 F, and bake the eggplant whole on a cookie sheet for about 45 minutes, rotating it every fifteen minutes so it bakes evenly on all sides. Let it cool, then peel off the skin and dice the eggplant into 1" cubes. Set aside.
Heat the oil in a skillet on medium high and cook the onions until translucent, about three minutes. Add the cumin seeds and let them sputter. Add the chopped serrano pepper, ginger, and cook for about two minutes, just until the peppers have softened through. Then add the coriander powder, turmeric, red chili powder, and salt and let it cook for about a minute. Add the tomatoes, and tomato paste and mix well, let it cook for about two minutes. Then add the eggplant let it cook on medium heat for about seven or eight minutes. Keep stirring and mashing down the while it cooks. Garnish with chopped cilantro or parsley. Serve with any kind of carb like rice or naan. Enjoy!