Tuesday, November 22, 2011

Fun Thanksgiving Treats

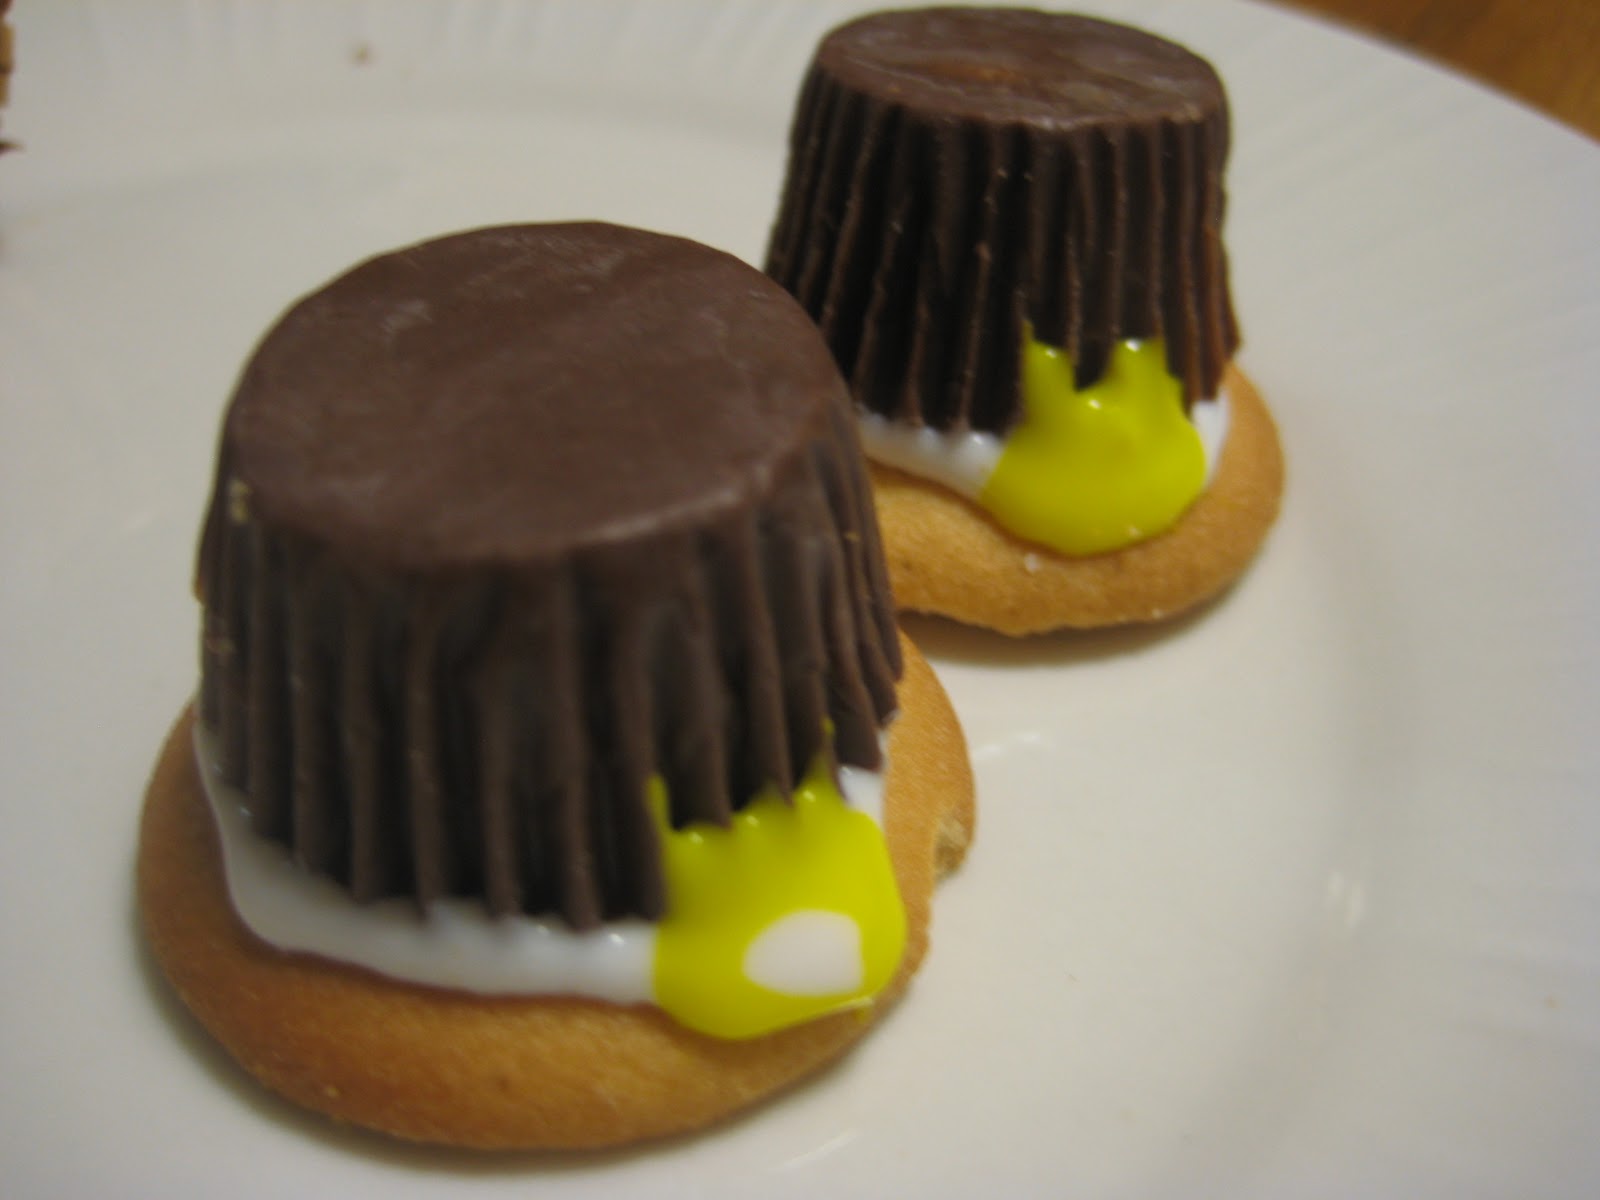
I have some time on my hands this Thanksgiving with it being just the two of us. So, I thought I'd make a few treats to share with coworkers, neighbors and such folks. I mean, why wait until Christmas, right? :) I saw a photo for these pretty edible acorns online a little while ago and thought they were too cute to pass up! And the pilgrim hats, well, what can I say. We just so happened to have the ingredients on hand.


Both of these ended up being so easy and fun to make. Perfect for sharing, and almost too cute to eat. I do hope you enjoy these quick treats:

Edible Acorns


You will need:

Donut holes
Toffee bits
Bits of Pretzels
Some kind of "edible glue" (peanut butter, nutella, or frosting :)

Spread some of the "edible glue" on the top one-third of each doughnut hole. (By the way, is it "doughnut" or "donut"? I can never tell.) Then dip the gluey top in toffee bits. Lastly add a bit of pretzel for the stem. Store in an airtight container. Enjoy!


Pilgrim Hat Cookies


You will need:

Nilla wafers
Mini Reese's peanut butter cups
White decorator gel
Yellow decorator gel

Unwrap the mini peanut butter cups and place bottom up on each nilla wafer. (Use some of the decorator gel as glue.) Then, with white decorator gel, pipe a band around the base of each mini peanut butter cup and then make the hat buckles with yellow decorator gel. Enjoy!

Thursday, November 10, 2011

Coriander Chicken

I'm having one of those evenings. Stuck indoors, wistfully imagining being someplace else. Maybe someplace warmer. Someplace more exotic. Do you ever get that way? If you're a fellow foodie, you also understand when I say that the longing to be someplace warm and exotic is usually accompanied by a craving to eat something..."different". If you're having one of those days too, this dish may be something to try. (This is something so wonderful about Indian food...the incredible variety of dishes you can enjoy.)

It was really this longing, combined with my Kerala heritage that inspired me to put together this dish for dinner. It's a recipe that I have been making for years, one that quickly became a household favorite. This one is not quite a curry, and not quite a dry dish but, rather, something in between. The Malayalam word for this is called "piralen" and can be made with really any kind of meat, and uses an array of fragrant spices. As I mentioned, traditionally this dish has less gravy, but I have adapted it to my kitchen and the apparatuses available to me (no, I do not have a mud pot or open fire to cook these things in!) If you would prefer to try something a little bit closer to the original version, you might want to remove the chicken once cooked and continue cooking down the gravy until it is drier then put the chicken back.


Coriander Chicken


You will need:

1.5 lbs of chicken, thighs or breasts cut into manageable pieces
3 tbsp corriander powder
1 tbsp red chilli powder
1/2 tsp pepper
1/2 tsp cumin powder
1/4 cup finely chopped red or white onion
2 tbsp minced garlic + 1 tbsp finely chopped ginger (or 3 tablespoons ginger-garlic paste)
2 tbsp vinegar
1 teaspoon salt (or more or less to taste)
2" piece of cinnamon
8 cloves
2 whole green cardamoms
1 star anise
2 cups or more water for the gravy

Grind or pound together the cinnamon, cloves, cardamoms, and star anise. Mix this and all other ingredients except chicken and water to form a marinade. Add the chicken, mix well to coat with the marinade mixture and let marinate for at least 1 hour covered in the refrigerator. Then, transfer to a heavy-bottomed skillet or saucepan, add enough water to cover the meat and bring up to a boil. Then, cook uncovered on low heat until done. This took about 40 minutes on my stove for chicken thighs (boneless skinless chicken breast cut into bite-sized pieces will take much less time, probably around 20-25 minutes.) Serve as a curry with rice or flatbread. You can also remove the chicken once cooked and continue cooking down the gravy until it is drier, as the dish traditionally calls for. Enjoy!

Sunday, October 9, 2011

Lemon Curd Tartlets

I am only slightly ashamed to say that a television show was the inspiration behind my making this dessert. Actually, one episode of a TV show. We are huge fans of the 90s sitcom "Friends". We have watched every episode multiple times, and the show never ceases to keep us laughing for hours on end. And, of course, this is completely useless information for normal people, but we would probably beat a lot of you at any sort of "Friends" trivia game (anyone challenge? :)  Anyway!  In a particularly classic episode guest starring Jon Lovitz, his character (sky high at the time, mind you) hears the word "tartlets", and repeats it a few times, in wonder, then says "...word has lost all meaning." Of course, this sends us into a tizzy of laughter every single time we watch that episode (or sometimes even by just remembering it). In honor of that episode, I am actually doing something I'm not particularly fond of so don't do that often - baking - "tartlets".

All anecdotes aside, these are pretty darn good. Very easy to make these using a mini muffin pan. My tartlet pastry is a bit sweet, but not too sweet. And the lemon curd has just got that perfectly lovely lemony taste. I only make this about once a year because I really cannot resist eating them all. You should try it too :)


Lemon Curd Tartlets


You will need:

For the tart shells-
1 1/2 sticks unsalted butter, room temperature
1/2 cup sugar
1/2 teaspoon pure vanilla extract
1 3/4 cups flour
1/4 teaspoon salt

For lemon curd-
3 large lemons, room temperature
1 1/4 cups sugar
1 stick unsalted butter, room temperature
4 eggs, room temperature
pinch of salt

Tart shells:
Preheat oven to 350 F. In a large mixing bowl, mix the butter and sugar together until just combined. Add vanilla extract. In a separate bowl, sift together the flour and salt, then add to the butter-sugar mixture. Mix until the dough starts to come together. Remove to a floured surface and shape into a ball. Then break off marble-sized pieces of dough, roll between palms, flatten into discs and press each into the cups of a mini muffin pan, just until they come up the sides a bit. You should have enough dough to make about 32-36 tartlets. Press a fork into the base of each tartlet one or two times so steam can escape and they don't puff up. Bake the tartlets in a preheated 350 F oven for 15 minutes. If the edges start to brown too quickly cover the mini muffin pan with a sheet of aluminum foil in the last 2-3 minutes of baking. Cool the pan completely before removing tartlets. Use a finger to push them out, they should come out very easily.

For the lemon curd:
Remove the lemon zest with a vegetable peeler or micro plane grater, remember to avoid the white pith (will give a bitter taste). Then, juice the lemons so you get enough to make 1/2 cup of juice and set this  aside. In a food processor, mix the lemon zest and sugar until combined. The zest should be finely minced. Then, in a bowl, cream together the butter with the sugar-lemon zest mixture. Add the eggs, one at a time, followed by reserved the lemon juice and salt. Mix for a minute or two, until well combined.
Then pour this into a saucepan and cook over a very low heat, stirring constantly, until thickened. This may take about 12-15 minutes depending on the heat. Lemon curd normally thickens at a temperature just below a simmer. Remove from heat.

Fill the tartlet shells with the warm lemon curd and leave it alone (if you can resist the urge to try one) until it sets at room temperature. Will keep in an airtight container in the refrigerator for several days. This freezes pretty well too, so it's a good make ahead dessert. Enjoy!

Note: you can alternatively make the tart shell using a regular tart pan with a false bottom. It will take a bit less time, but then you'd have to cut the whole tart into wedges to make servings and that's just so boring, no?  :)

Thursday, October 6, 2011

Curried Cauliflower Soup

Seven more months of rain?  I have a feeling we're going to be having SOUP for dinner quite a bit!  This is another easy one worth trying, a good comforting soup for rainy and cold evenings.  This recipe makes a big batch, so if you are cooking for just two there will be plenty left over for the next day's lunch.  Try it!

Curried Cauliflower Soup


Serves six to eight.

You will need:

1 whole cauliflower, cut into florets
1 small white or red onion roughly chopped
3-4 cloves garlic
1 tablespoon minced fresh ginger
5 cups vegetable broth
1 (14 ounce) can coconut milk (light is fine)
1 tablespoon yellow or red curry paste
1 pinch turmeric
1/4 teaspoon coriander powder
2 tablespoons vegetable oil
optional - salt to taste (if broth is unsalted)
optional - fresh cilantro for garnish

Saute onions and garlic in the oil in a large pan on medium heat, until softened, about 4-5 minutes. Add the cauliflower and continue to cook on  medium heat until florets are halfway cooked, about 4 minutes, adding a little of the vegetable broth if necessary to keep the vegetables from sticking to the bottom of the pan. Add curry paste, turmeric, and coriander powder and stir well. Then add all the vegetable broth, coconut milk and bring to a boil. Then reduce heat to low, cover, and simmer for 15 minutes. Puree the soup (carefully) in a blender in batches or with a stick blender. Simmer before serving. Serve warm, topped with a little fresh cilantro if desired. Enjoy!

Monday, October 3, 2011

Easy Lemony Tortellini Soup

I don’t care if you say you can't cook, or say you don’t have time....ANYONE can boil water! Which is all this soup entails. This is an easy to make, great alternative to chicken noodle soup, perfectly comforting for these cozy Fall evenings. As a bonus, this uses the most interesting pasta ever - Tortellini! Easy to put together at the last minute for lunch or dinner. Seriously….try this:


Easy Lemony Tortellini Soup


Serves four.


You will need:
4 cups vegetable or chicken broth
1 pkg dried tortellini (3 serving pack, you will find it in the pasta aisle in grocery stores) cooked per package instructions
1 tablespoon lemon juice
1 tablespoon chopped fresh parsley
1/2 teaspoon freshly cracked black pepper
optional - salt (skip if broth already contains salt)
optional - 1 teaspoon lemon zest (this gives the soup amazing flavor!)
 
Heat the stock to a boil and add cooked tortellini. Stir in lemon juice (and optional lemon zest). Divide equally among four soup bowls, top with parsley, and pepper. Serve immediately, with an extra lemon wedge if desired. Enjoy!

Monday, September 19, 2011

In Season Dessert: Blackberry Pie

There is a trail not far from where we live, that is just teeming with wild blackberry brambles. Plenty of good fruity blackberries, ripe for the picking. (Have I mentioned lately how much I love living in the state of Washington?)  I'm fairly certain we will be heading back to that trail to do a little more picking before they all disappear for the next nine months with the looming onset of "rainy season".

So, finding ourselves with a free morning last weekend, the husband and I set out with tupperware containers and braved the thorny bushes to pick a whole bunch of these beautiful ripe wild blackberries. And then I thoroughly washed and cleaned the berries in order to spend the afternoon experimenting with blackberry pie recipes. This particular recipe is as simple as it gets, with not much more than fresh fruit, sugar, and a hint of lemon. Not too sweet, just sweet enough.  And so easy, you need to try it.


Blackberry Pie


Makes 8 servings.

For the filling you will need: 
5-6 cups blackberries, washed clean, and patted dry
3/4 cup white sugar (or 1/2 cup, varies with how sweet the berries are. For store bought berries 1/2 cup should do it)
3 Tbsp all purpose flour
1 tablespoon lemon juice
1 teaspoon lemon zest
1/4 teaspoon ground clove
1/4 teaspoon ground nutmeg
1/4 teaspoon ground cinnamon
1 Pie crust - you can follow my standard sweet pie crust recipe that I have been using for years or use store bought)

For the pie crust you will need:
2 1/4 cups all purpose flour
2 sticks butter (1 cup)
1 tablespoon sugar
1/2 teaspoon salt
1/2 cup or more ice water
Optional - eggwash (1 egg+1 tablespoon water)

Pie crust:
Mix the flour, salt, and sugar in a large bowl. Then cut the butter in and combine until the mixture is grainy and resembles coarse sand. Then, add ice water one tablespoon at a time and mix well until dough is firm and there is no dry flour remaining. Separate dough into two halves. Flatten each half down into 3-4" discs, cover each with plastic wrap, and refrigerate for at least 1 hour (8 hours or overnight is okay too).

Filling:
Combine sugar, lemon zest, lemon juice, and flour, and sprinkle this over the blackberries. Stir well so the berries are slightly crushed and well coated with the sugary mixture. Set aside for 30 minutes.

Preheat oven to 375°F. 

Roll out pie dough on a lightly floured surface and line the bottom of your pie pan with the dough. Roll out the second ball of pie dough for the top crust. Spoon the berry mixture into the dough-lined pie dish. Place the second rolled-out pie dough crust on top of the pie. Trim off the edges of the pie crust to fit the pie pan. Score an "X" in the top with a sharp knife to create air vents for the steam to escape. Place the pie on the middle rack of the oven. Put a baking sheet on the lower rack to catch any juices that might bubble out of the pie while it's cooking - and this WILL happen, trust me!  Bake the pie at 375 F for 40 minutes or until  crust is golden-brown and filling is bubbly.  If necessary, protect the pie with aluminum foil if it looks like the edges and tops of crust are getting burnt. (Optional - just before putting the pie in the oven, you can brush the top crust with eggwash. The eggwash will give the pie that golden "pie glow". Note that this step is completely unnecessary and will not affect the flavor of the pie, the eggwash just makes the crust look pretty.)
When done baking, remove from oven and place on a wire rack. Cool completely before serving. Enjoy!

Note:  the recipe I have written above is for a regular crust, but I love the look of the lattice crust. If you've never tried a lattice crust, I would encourage you to try it. It is much easier than it looks, and so pretty! 

Wednesday, September 14, 2011

Samosas

Samosas are probably the most delicious Indian snack, ever. At least, according to a lot of people I know. And samosas are the most requested Indian dish in my circle of friends. Seriously, even people who don't like Indian food will eat these delicious little deep fried savory treats.

There are literally hundreds of different ways to make the samosa filling, depending on where you grew up or who you ask, but here's a simple recipe that I have been making for years and has become very popular with friends. This filling is an all veggie option, and is really tasty with just the right amount of spice and tangyness. The pastry is just about perfect too. (If you don't want to go to the trouble of making the pastry at home, a couple of shortcuts are wonton skins or frozen puff pastry. Both are easy substitutes and cut your prep/cooking time significantly.) Whether you choose the shortcut methods or the original, prep is still labor intensive so make sure you have plenty of time before getting started. Hope you enjoy this recipe!

Samosas


For the samosa filling, you will need:

2 Tablespoons vegetable oil
1/2 teaspoon cumin seeds
1/2 teaspoon mustard seeds
2/3 cup finely chopped onion
2 Tablespoon chopped fresh cilantro
1 Tablespoon dried mango powder, or 2 Tablespoons lemon juice
1 teaspoon cumin powder
1 teaspoon coriander powder
1 teaspoon salt
1 teaspoon red chilli powder
5 medium potatoes, peeled, cut into 1/2" pieces and boiled for 15 minutes
1/4 cup peas (optional)

Heat the oil in a large skillet on medium heat. When oil is hot, add the cumin seeds and mustard seeds. When the seeds pop, add onion, and cilantro. Sauté until the onion becomes translucent, about 3-4 minutes, then add dried mango powder or lemon juice, cumin and coriander powder, salt, and red chilli powder. Sauté a few minutes just until the spices have cooked a bit, then add the cooked and drained potatoes, and the optional peas. Mix well and sauté just until heated through, them remove from heat and set aside.

To make the samosa pastry, you will need:

2 cups plus 2 tablespoons all purpose flour
2 1/2 Tablespoons vegetable oil
1/2 teaspoon salt
Water

Mix the flour, oil and salt in a mixing bowl, then add water gradually (about 1/4 cup at a time) until the dough holds together, and knead well. Roll into a ball and cover with a damp paper towel. Let this dough rest for about 20 minutes. Then, break off walnut sized balls of the dough, and roll out into 5-6" circles. Cut each circle in half. Fold each half-circle to form a cone. Fill the cone with about a spoonful of the potato mixture. Press the samosa between your palms to remove air pockets. Moisten the edges with some water, and seal.

Deep fry the samosas in a lot of oil (at least 2" deep) until golden brown, turning twice; drain. Serve hot plain or with your choice of chutney (sour chutneys are best), or preferred dipping sauce. Enjoy!