Monday, September 16, 2013

Pears and Ricotta on Toasted Multigrain

This is my new happy mood breakfast. Or brunch. Or dinner. Or snack. It really just makes me smile!

Pears and Ricotta on Toasted Multigrain

Easy as pie, and tastes sort of like it too. There's really no exact recipe. And feel free to use any kind of fruit; I only used pears since it's the season and we were blessed with quite a few this year. But here's what you do. Mix up some ricotta, with a bit of lemon zest and fresh grated ginger and refrigerate until ready to use. Slice up some pears and caramelize them in a bit of butter, cinnamon, and brown sugar. Slice up some multigrain bread (or any bread), and toast it. Spread with ricotta, top with the sliced pears and then, if you like, drizzle some of the pan butter on top.

Brunch. Or Dinner!

The only thing left to do is to eat it all up immediately. Just as we have, in our house, four times in the last week. Enjoy!

Thursday, July 18, 2013

Asparagus Shrimp Stir Fry (10 minute dinner!)

With the asparagus season so short lived, you want to take advantage. I've already filled my freezer with beautiful whole asparagus spears and cut asparagus to tide us over until next spring, and I still can't get enough of eating it fresh. What could be better? Ten minutes to dinner? Yes, please! The ultra easy recipe follows below.

Asparagus Shrimp Stir Fry

Asparagus Shrimp Stir Fry

Serves 3-4

You will need:

1 1/2 lbs fresh asparagus, cut into 1" or 2" pieces
2 cups frozen cooked shrimp, fully thawed, tails removed
1 tablespoon sesame oil
1/3 cup any stir-fry sauce
optional - 1/4 teaspoon crushed red pepper
optional - sesame seeds

Heat up the oil in a large saucepan over medium heat. Add asparagus and sauté stirring now and then just until lightly browned, about 2 minutes. Stir in shrimp and allow to heat through, about 2 minutes. Add the crushed red pepper if you like, then the stir fry sauce. Stir it well, turn off the heat, cover the pan and let sit for a minute. Serve over hot rice, topped with sesame seeds if you like. Enjoy!

Monday, July 1, 2013

Yellow Beets, & Yellow Beet Risotto

I found some bright, delicious-looking organic Yellow Beets at the farmer's market on Saturday. Gorgeous, huh?  I've been in a risotto sort of mood lately, so, despite the 90-degree weather Seattle has been experiencing this week, I decided to turn on the stove and make a yellow beet risotto.

Yellow Beet Risotto

Boy, am I glad I did. I used my basic risotto recipe, using red onion instead of white and skipping the garlic and wine (you don't need them here!), and substituted the yellow beets plus their chopped up greens in place of whatever veggies I would normally use. A splash of balsamic vinegar, and a sprinkling of goat cheese added the final touches and kicked it up a notch! It was the perfect dinner on a warm summer evening. It tasted like summer, and was just oh-so-yummy!


Yellow beets - I will definitely be cooking with you again.  

Thursday, June 27, 2013

Foraging: Red Huckleberries!

Red Huckleberries are slowly starting to ripen in our area. Red Huckleberries, while abundant in the Pacific Northwest, are a pain to pick because the berries are tiny and the entire bush moves when you pluck just one. But the effort is well worth the reward. We only learned about these babies in the middle of its season last summer, but are ahead of the game this year so will be taking full advantage of the entire picking season!


We enjoy eating these little red gems just plain on cereal, granola, or sprinkled into salads. But local experts have many more clever recipes that use red huckleberries. The berries are a bit on the tart side, but juicy and slightly sweet, making it perfect for jams as well. And, boy, are they delicious any way you eat them!  


Unable to wait a minute longer, we picked a modest 4 oz. at the park down the street from our house last night in the last few minutes of sunset, deciding to save more serious picking for the next few weekends. If we can get to them before the bears do! 

Tuesday, June 18, 2013

Peanut Butter Oatmeal Squares

Peanut Butter, Oatmeal, and Chocolate are all popular foods with the husband. And I am a big fan of anything that is a salty-sweet combo...a major exception to the fact that I have more of a salt-tooth than a sweet-tooth. So, peanut buttery-oatmealy-chocolatey treats are sure not to last too long in our house. Which is probably why I don't make these kinds of things very often. Plus, I am not a baker.

But, I did put these Peanut Butter Oatmeal Bars together in about ten minutes, with only ingredients I happened to have in the pantry, and had time to wash and put away all the ingredients and baking things while it sat in the oven. They are not too sweet, dense and hearty, and very filling as a snack or dessert, or grab n go breakfast. And, since this recipe does not contain any oil, butter or eggs, the "worst" ingredient in here is brown sugar, or chocolate chips if you choose to add them. So, an overall winner recipe in my mind!

Peanut Butter Oatmeal Squares (or Bars)


This recipe makes an 8"x8" pan's worth. I won't bother to list how many servings that is, but if you cut your squares small, probably around nine or twelve total servings. If you have at least two people around and it lasts you more than two days I will have to seriously judge you.

You will need:

3/4 cup peanut butter (I use either Trader Joe's or Skippy Natural chunky)
1/2 cup brown sugar
1 Tbsp real vanilla extract
1 cup old fashioned rolled oats
1 cup flour (whole wheat or unbleached all-purpose flour work fine)
pinch salt
1 tsp baking soda
1/2 cup milk (we use skim)
Optional mix-ins: 1/3 cup chocolate chips, 1/3 cup chopped roasted peanuts, or three tablespoons of each!

Preheat oven to 350 F. Cream brown sugar and peanut butter together with a hand mixer for about 2 minutes or until well combined. Add vanilla extract, mix for another minute or so. Add remaining listed dry ingredients through milk, and mix again until the dough is crumbly and well combined. Add milk, mix again until the dough gets sticky.  Fold in the mix-ins. Scoop the dough together, and dump it all into an 8"x8" pyrex dish, press down evenly. Bake for 20 minutes. Let cool completely, then cut into bars or squares. They will be cookie-like on the outside, and chewy soft in the middle. Store in an airtight container at room temp, or freeze for later. Enjoy!

Monday, June 17, 2013

summer's first strawberries

The little strawberry patch has been thriving at our new place, and the first berries ripened over the weekend. We picked nine strawberries and found them to be so precious a treasure that we ate them right away, savoring them to the last juicy bite. There might have been a couple more berries, but, alas, it looks like we had to share them with birds and other creatures. This is definitely one drawback to pesticide-free, organic gardening, but it's a price we're willing to pay for what we get out of it.


We'll have more strawberries ripening soon, and I can't help but remember how impatient I was last year when we put this patch in, picking off the blooms that first year and urging the plant to hurry up and grow! And now I think this was so worth waiting for. Look at how gorgeous our berries are!


I've been amazed over the years at how easy it is to grow and care for strawberries, and how sustainable a crop it is since it expands and produces more all on its own. You won't get a yield the first year, but the following year you will have several berries and be amazed! We started our patch with five June-bearing plants last year, deliberately picking a mix of two different varieties that do well in the state of Washington, and now we're seeing pretty decent results, with having put in very little weeding or maintenance the past year. At only 2 feet by 8 feet, this a small strawberry patch by most standards, in a sunny but otherwise unused spot along the side of the house. It will yield enough for us to enjoy in-season, but not enough to can or freeze or do anything. So we're starting to scout out a little more space in unused corners of our yard, to put in a new patch, and hopefully, double our yield in two years. Maybe then we will have enough to make jam, and freeze for our smoothies, desserts, and whatever else we do to enjoy these babies through the rest of the and until the following June when we will see them again. This is too precious, too sustainable, and too easy a fruit to grow to ignore its potential!


Thursday, June 13, 2013

Red Russian Kale, oh the possibilities!

I planted a new variety of kale in my little garden this year. Red Kale. Red Russian Kale, to be exact. It is much more tender and delicate than the Dwarf Blue variety we planted for the second time this year. I had only planted one row, as I do with most new seeds but, after having cooked a few meals with it this week, I am so happy with the results and am kicking myself for not having more available right now!

Red Russian Kale Omelet

With that said, I am savoring every bite of what we have available to harvest now...we put it on grits for dinner the other night, alongside caramelized onions, and a fried egg on top. And, filled it into omelets for breakfast this morning with roasted garlic, a bit of thyme, and shaved asiago cheese. Tasty.

Red Russian Kale
This Red Russian variety - according to my research - tends to develop more flavor after frost (and freezes well, as all Kale does), so I think I will plant a few more rows in mid-to-late summer so we can continue savoring this tasty green treat through the winter months.

Friday, May 10, 2013

Farmers Market Opening & Potato Leek Soup

Our local farmers market opened for the season last weekend. We were there bright and early, sporting reusable totes and big smiles on our faces. The weather could not have been better, sunny and in the upper seventies, and lucky us since this is atypical for our area in early May. We wandered around with our friends, took in the sights, smells, sounds, colors, fed the Alpacas and returned home armed with plump happy fruits and veggies for the week including the freshest, biggest bunch of Leeks one could find (for $2!).

We whipped up this rustic, comforting, potato leek soup that same day and savored dinner out on the back porch enjoying those last few moments of warmth just before the sun went down.

Potato Leek Soup
Serves 4-6

You will need:

3 Tbsp butter + 1 Tbsp olive oil
3 good sized leeks, chopped up (use only the whites and light green portion)
4 smallish Yukon gold potatoes cubed (we leave the skin on)
5 cups chicken or veggie stock
1 bayleaf
freshly cracked black pepper – optional

Add butter and oil to a heavy bottomed pot and let butter melt over low heat. Stir in the leeks. Cover and cook on low for about 10-12 minutes, stirring every once in a while to prevent the leeks from burning (trust me it’s easy to burn them, been there done that). Add bayleaf, potatoes, and veggie stock, bring to a boil then cook on low for 10-12 minutes or until potatoes are done. Toss out the bayleaf. The soup is ready; it may be slightly thin right now, but it will thicken up and get a gorgeous velvety texture as it sits and the potatoes start to disintegrate even more (this recipe makes a ton for just two so your leftovers the next day will be awesome!). But I also think that is part of the rustic appeal of this soup.
Serve soup hot topped with freshly cracked black pepper if you like, with good fresh bread. Enjoy!

Tuesday, April 30, 2013

Foraging: Stinging Nettles

Since moving to the state of Washington, I have been swept away by the foraging possibilities - both abundant and nearby. I have been devouring all kinds of information on the subject, learning about different things to look for by season. Winter is over here in the Pacific North West, and that means yummy stinging nettles are in their prime.

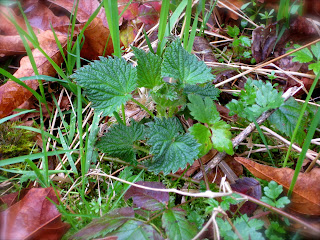
Stinging nettles - which lose their "sting" after being cooked for one minute - are easy to identify, and deliciously yummy. They remind me of spinach, but maybe a bit woodsier. I now substitute them for pretty much any dark leafy green veggie in recipes. Not only are stinging nettles pesticide-free gifts of nature, but according to my research, they are also a nutritional powerhouse, chock full of all the dark-leafy-green veggie benefits including iron, calcium, and folic acid.


In early spring, we donned long sleeves and pants, gloves, and boots, and ventured down to the nearest trails to pick our first lot. A modest half grocery bag's worth.


Never having cooked with Stinging Nettles before, I wanted to tread lightly. Even my husband (who generally does not get as excited about food) was all too eager to help me pick them, probably in large part for the fact that he got to jump into the weedy shrubs, thorns and brambles and be a little boy again. And we had two other adorable helpers.


You are supposed to harvest only the top two or three bracts of the plant while they're still young, so they have a chance to keep growing (at which point you can go back and pick more yumminess!) and snip off the leaves to cook with.


Unable to avoid curiosity, we cooked up that first batch immediately. Oh.So.Tasty! You cook them for a minute (which will disable the sting), then however your recipe calls for your leafy greens to be cooked.


It cooks down almost exactly like spinach, in the fact that it loses as much water.


Since then, we have gone back again and again and have picked many more bags full. Boy-oh-boy we have discovered a whole new world and have had so much fun experimenting with it in different dishes. Stinging nettle and garlic homemade deep dish stuffed crust pizza, anyone?

Or, simply tossed into boring old spaghetti sauce? Or, perhaps a semi-foraged version of delicious Indian Palak Paneer? The possibilities are endless. Thank God for these simple delights of nature.


Sunday, April 28, 2013

Sweet Potato Latkes


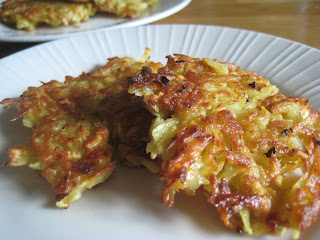
I love latkes. Regular potato latkes. I have also never met a sweet potato we didn’t like. Stay with me, I have a point.

All of a sudden, a craving for crispy potatoes hit. Easily fixed. A quick glance in the pantry confirmed only one small lonesome Yukon Gold potato, BUT…an ample supply of plump sweet potatoes. So...Sweet Potato Latkes here we come!

The following isn’t so much a recipe, as a suggestion of directions. The key is to squeeze all moisture from the grated sweet potatoes, otherwise they will not crisp up and turn golden brown as beautifully as they should. Other ingredients you might include with two grated sweet potatoes: ¼ cup finely chopped onion, scant 1/3 cup all purpose flour, 2 eggs, salt and pepper, and of course some oil and a cast iron skillet for frying.

Peel. Grate. Squeeze. Mix. Fry. Eat.


Sweet Potato Latkes

I like that this dish is not as heavy as sweet potato casserole or as greasy as fries. Rather, they end up some happy place in between. And fairly light if you only eat one or two – which may be challenging given how tasty they are! Plus, they just look special and different. Perhaps fancy enough for an appetizer, or to add a crisp element to a meal if you need that. Enjoy!

Wishing everyone a beautiful Spring.

Saturday, March 30, 2013

Banana Nut Pancakes, the Lazy Girl's way

Banana pancakes are good. Nut pancakes are better. When you put them together, they're great. But when you want to enjoy a quiet, lazy Saturday morning, and still make the most of the day, you get this. Banana Nut Pancakes, courtesy of the Lazy Girl (that would be me).


Banana Nut Pancakes

How do I make this happen, you might ask? Start with any pancake batter of your choice. Slice up a ripe banana or two, and find some nuts. Proceed to pop all but half the amount of banana slices in your mouth, then save the rest for your pancakes. (After all, that was the original intent except for the fact that banana slices are so yummy.)

Top each pancake like a pizza with a few banana slices, and a sprinkling of nuts just after you put some batter in the pan. Like so.


Flip and cook as you would normally. 


Easy, caramelized, deliciousness. Genius, no? Drizzle on maple syrup. Or don't...feel free to be boring like that. Enjoy!